Making a card for your budding magician ..... its a bit magical

Do you have a budding magician in the family? Know some how who loves magic tricks? Today we have a great tutorial from Design Team Member Ashleigh Newton Spence on how to make a handmade card which is a just prefect for magic loving friends and family.
Uniquely Creative Products Used:
- UC1858 Be Hoppy Stamp Set
- UCD2040 Be Hoppy Die Set
- UCD1972 Slim Stitched Nesting Rectangle Die
- UCD1961 Upper Case Outline Alpha Die
- UCD1940Star Wreath Die
- UC1855 Unicorn Magic Stamp Set
- UCE1702 Gold Sparkle Pen
Other Products Used:
- Distress Oxide – Black Soot, Chipped Sapphire, Prize Ribbon, Broken China
- Distress Sprayer
- Gansai Tambi Watercolour Set – Starry Colors (Light Gold)
- Copic Markers (E40, E41, E42, E43, 0, Y26, R11)
- Sakura Black Glaze Pen
- Sakura White Gelly Roll Pen
- Gold Glitter Cardstock
- Matte Gold Cardstock
- Black Cardstock
- Tombow Mono Liquid Glue
- Heat Tool
- Versamark Embossing Ink
- Brutus Monroe Gold Sparkle Embossing Powder
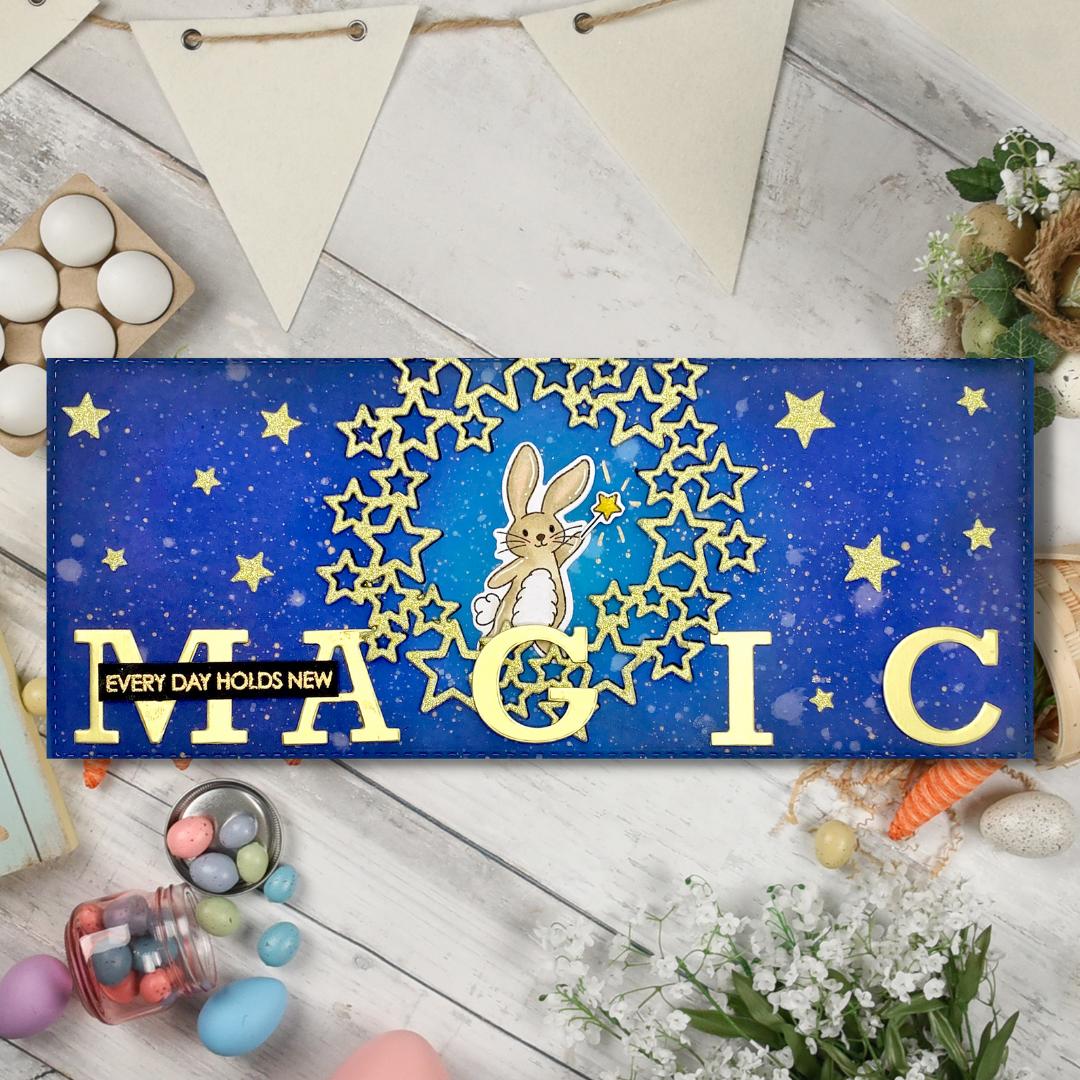
1. Cut one of the largest Slim Stitched Nesting Rectangle from white cardstock.
2. Using blending brushes, blend your panel. Start with Broken China, then move to Prize Ribbon and then to Chipped Sapphire. Take your time to get that perfect blend. Add a bit of Black Soot around the edges to darken them.
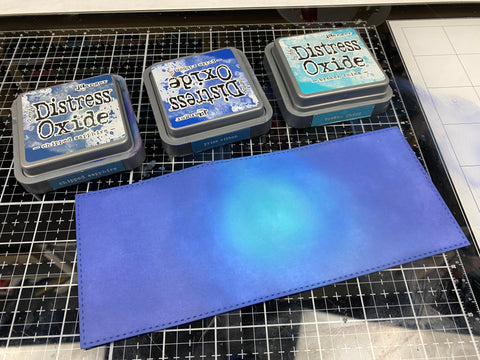
3. When you are happy with the blend, spray the entire panel with a water spritzer of clean water. Dry off the excess with a paper towel. Using your metallic watercolours, splatter the background with the light gold colour. While you’re splattering, grab a Uniquely Creative gold glitter pen and add that into the background.

4. Using the Star Wreath Die, cut one from the gold glitter cardstock and then two from black cardstock. Stack them up to create one wreath.


5. Using an acrylic block, stamp out the bunny in Copic friendly ink. Colour it in using the E40 family of markers. Don’t forget to add some shadows to the tail, your white highlights, and some black glaze pen for the eyes! Then, cut the bunny out with his matching die.

6. Using the Upper-Case Outline Alpha Die, cut out the word MAGIC from matte gold cardstock. Using this matte cardstock gives a really great old time-y feel to the letters.

7. Arrange the wreath over the lightest part of the blending and adhere with glue. Pop the bunny in the middle and arrange the letters. You may need to lift corners of the wreath stars for this. Once everything is adhered, cut out a few more wreaths from offcuts of the glitter cardstock and pop out the middle stars to use as decoration. Adhere with glue in random places all over the card front.

8. Using Gold embossing powder, emboss the ‘Every Day Holds New Magic’ sentiment from the Unicorn Magic stamp set. Ashleigh tried two different golds to find the perfect colour to match her card.

9. Using the star from the Hoppy Day stamp set, make a wand by drawing a line down from the middle of one of the star points and cut out to make your own die cut. Colour in with Copic Markers, add some Sparkle Pen and stick down in the bunny’s hand using liquid glue and a foam square. Add in a little gold sparkle pen to finish off the magic look.
