Christmas Wreath Tags - Natalie Elphinstone
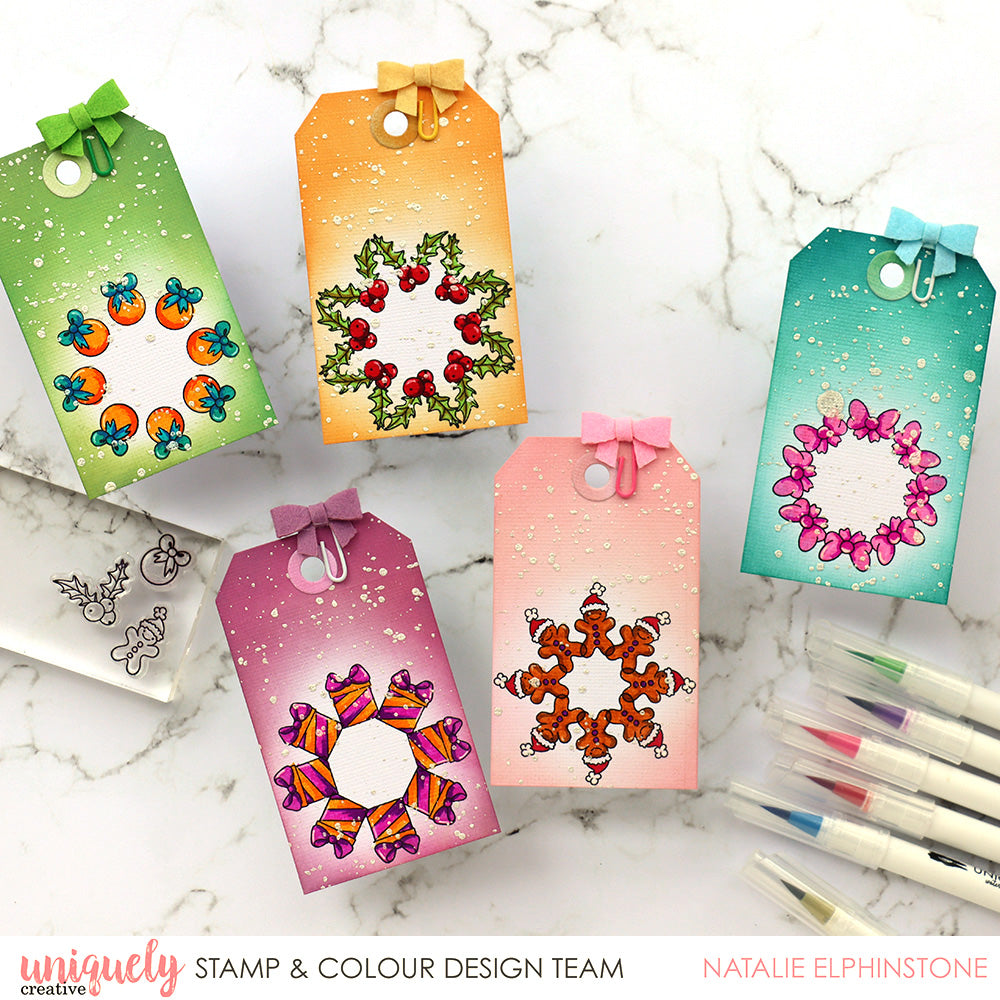

Tag Size: 2.4" x 4” white cardstock
Uniquely Creative Products Used
Aussie Christmas 2 Stamp Set, O Christmas Tree Stamp Set, UNIQOLOUR Markers
Other Products Used
Staz On black ink, Gina K Mini Wreath Builder Template, Mini Misti stamp tool, Sizzix Tag die, Tim Holtz Distress Ink, Bella Blvd bow clips, silver spray ink
Instructions
1. Gather your supplies and cut out a series of white cardstock tags. The Mini Wreath Builder template (that’s the star-shaped stencil you can see in the picture) I’m using requires your cardstock to be cut to a width of 2.4”… and guess what? I’ve got a Sizzix die that will cut out tags that exact same width! It’s just as easy to hand-trim some tag shapes the same size. And in fact, after I cut mine out with the die, I ended up trimming some of the length off my tags (to a length of 4”) so it would fit easier in my Mini Misti stamp tool.

2. To be honest, I had to not only read the instructions on the Wreath Builder packaging, but also watch some YouTube videos to figure this thing out.. but let me see if I can explain to you how to do it!
You put the Wreath Builder into your Misti or Stamp Positioning Tool and then align your tag in it as well. Pick one of the miniature stamps from either of the stamp sets (I’m first using the gingerbread man from the ‘O Christmas Tree’ set first) and place it to the right of your tag. Bring the door of the Misti down to pick up the stamp, and then stamp it onto your tag with a waterproof black ink.

3. Make sure you don’t move the stamp from its position on the Misti door, but instead rotate your tag around to the next position on the ‘star’ of the Wreath Builder template. And then stamp the gingerbread man again. Keep on going until you have built up the entire wreath.

4. You’ll find lots of small stamps that are suitable for the same technique in the ‘Aussie Christmas 2’ stamp set, as well as the ‘O Christmas Tree’ stamp set. I made 5 tags this way.

5. Next it’s time to start adding some colour! I used a blending brush to blend some different ink colours around my tag, but leaving the wreath clear. It almost looks like it’s glowing!

6. Because I didn’t use watercolour paper to cut my tags with (I just used ordinary white cardstock), I used my UNIQOLOUR makers to colour the images directly. This gives a lovely bold saturated colour which is what we want anyway. And it’s still easy to achieve a blended look by starting with a lighter colour first, and then colouring the shaded areas of the image with a darker tone over the top.

7. To finish off my tags I added a very generous sprinkling of opaque silver spray ink over the top. It looks a bit like snow which for some reason seems to feel appropriate for a Christmas themed project, even though of course it’s always summer here in Australia for Christmas!!
I’ve intentionally left the tops of the tags reasonably clear so that I can use these for gift tags – having a space to write who the gift is for and from.

