Deck the Shed - Chick Mitchell
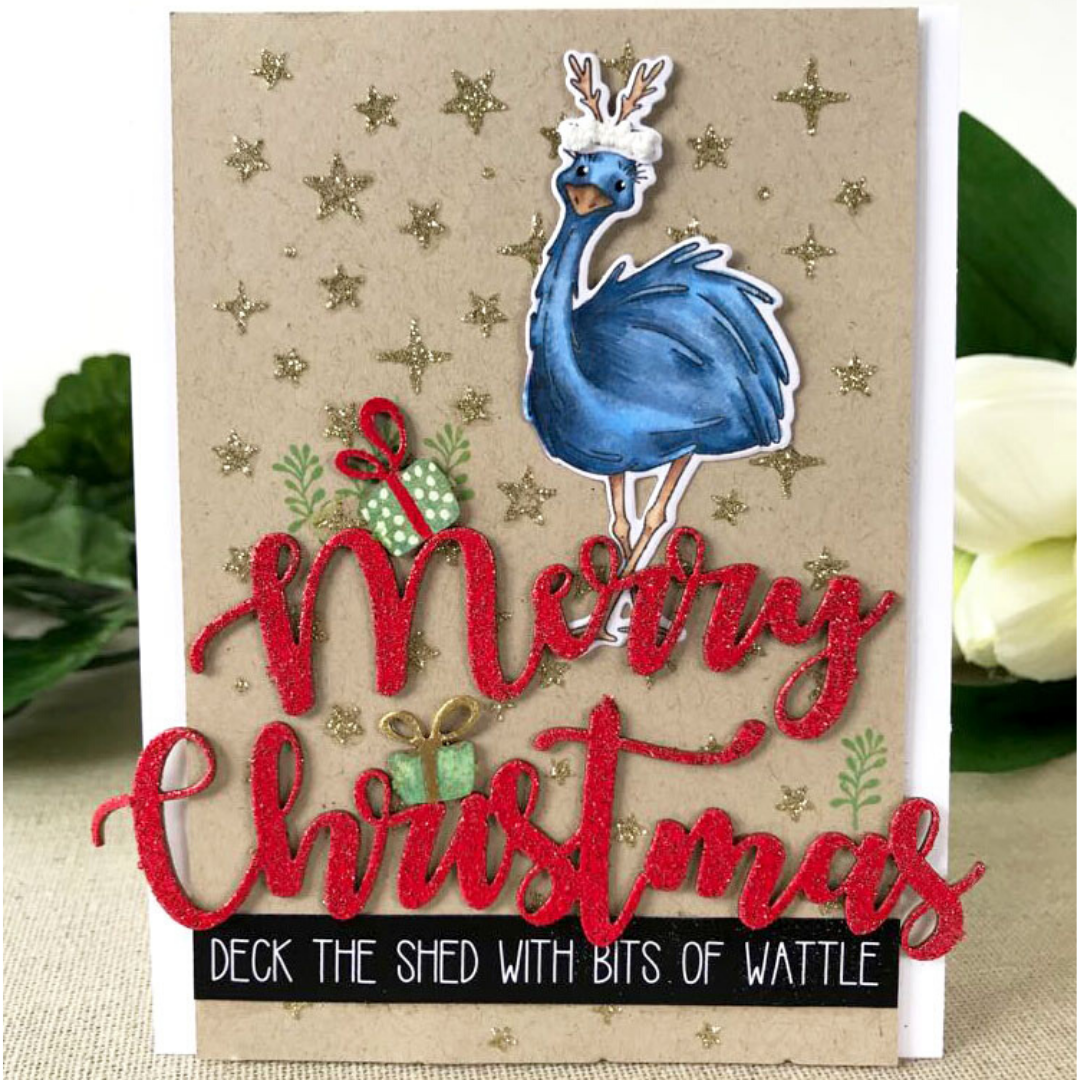

I thought this little guy was so cute, and I imagined him having fun hiding/hunting for his gifts!
Uniquely Creative Products Used
Aussie Christmas Stamp and Die Set, Star Stencil,cut-apart sheet & laser cut
Other Products Used
Gold Nuvo Glimmer Paste
Colours Used
Copic Markers: B37, B34, B32, E25, E34 E31
Black and White Sakura Gel pens for eyes.
Tsukeniko Radiance Amplify for the Antlers.
Gold and Red Sparkle Embossing Powders.
Mowed Lawn and Festive Berries Distress Oxide Inks.
Ranger Embossing Pen.
I used the stencil and gold glimmer paste to create the background on a piece of Gina K Designs Kraft cardstock, trimmed down to 3.75 inches x 5.5 inches.
The emu was coloured with Copics, and I heated some Radiance Amplify to give his antlers some fun dimension and glued them together.
The Merry Christmas chipboard elements were included in the kit, and I coloured them with Distress Oxide Ink, simply by pressing them directly onto the ink pad. I then heat embossed some sparkly red embossing powder on top of that. An easy way to do this is to temporarily attach your pieces to a strip of cardstock to use as a handle, and you can get a nice smooth finish to your inking and embossing without marks from fingers or tweezers. I did the same thing with the little gifts, pressing them directly onto a Mowed Lawn Distress Oxide ink pad. I then used a Ranger embossing pen to draw in the ribbon line, and colour the tops of the bows and heat emboss with red and gold powders. Some white gel pen dots were added as decoration for the wrapping paper.
I spent some time deciding placement and glued the emu’s legs down, but used foam dots for the top half to lift him off the page a little. I stamped a few wattle sprigs using Mowed Lawn Distress Oxide Ink and glued down the sentiment strip and laser cut.
I used the Black and White Sakura gel pens to give his eyes a bit of shine and a little twinkle.
Here’s a close up so you can see the added details.
