Just for You - Jenny Dix
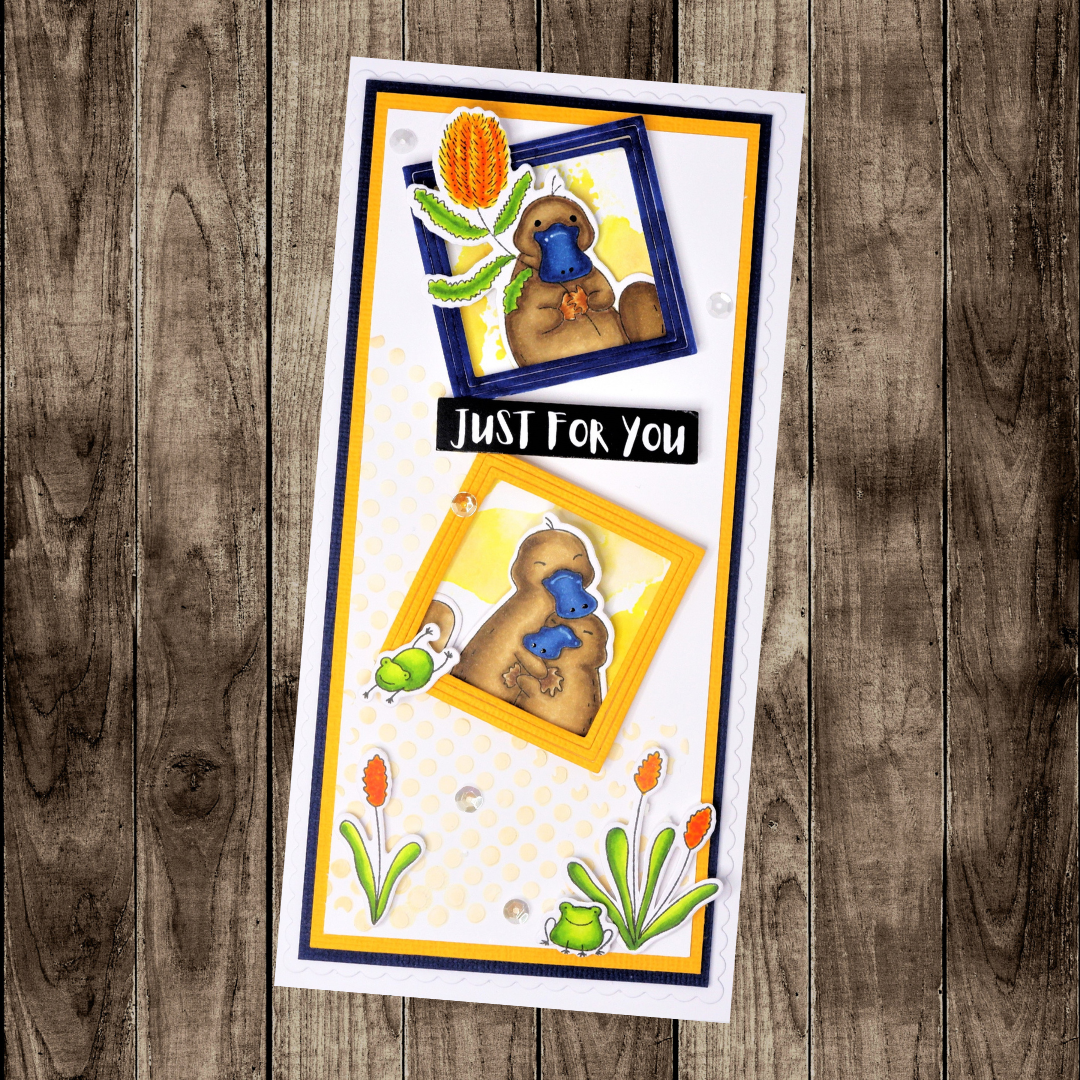

Card Size 4 ¼” x 5 ¾”
Uniquely Creative Products Used
One Of A Kind Stamp Set, One of a Kind Die Set, Tiny Dots Stencil, One of a Kind Cut-a-Part Sheet, Frames Die , Square Frames Die, Ice Sequins, My Platypus Stamp and Die Set
Other Products Used
White, Yellow and Blue Card Stock,White Texture Paste, Scattered Straw & Wild Honey Distress Ink, 3D Tape, Tape Runner, Glue
Colours Used
Copic Markers
Platypus – E42, E43, E44, E47
Bill – B34, B37, B39
Feet – E31, E33, E35
Leaves, Frogs – YG01, YG17, YG23
Flowers – YR09, YR21, Y00, Y08
Instructions
1. Cut a base 7 5/5'' x 7 3/4" in White Cardstock, 7 1/8'' x 3 2/8'' in Blue Cardstock and 3 1/8'' x 6 7/8'' in Yellow Cardstock. Then in White Cardstock, I enlongated the scalloped rectangle frame until it has 36 scallops along the side. Adhere them using 3D tape.

2. Die cut 2 of the small squares one in yellow and one in blue. Run some tape on the back of them to hold them together. Cut a piece of White Cardstock 6 5/8'' x 2 7/8''.
3. Using texture paste with a small amount of Scattered Straw Distress Ink mixed in and the Tiny Dots Stencil, cover half of the panel.
4. Cut 2'' x 2" (x2) pieces of White Card Stock and smoosh them in Scattered Straw and Wild Honey Distress Ink.

5. Colour in the images with the colouring medium of your choice and cut out the sentiment from the cut-a-part sheet.

6. Use 3D tape around the Square Frames and place the platypus in them with the backing squares on.
7. Adhere all of the pieces together and finish off the card using a scattering of sequins
