KIND OF WONDERFUL LAYOUT TUTORIAL - DEBRA BEER
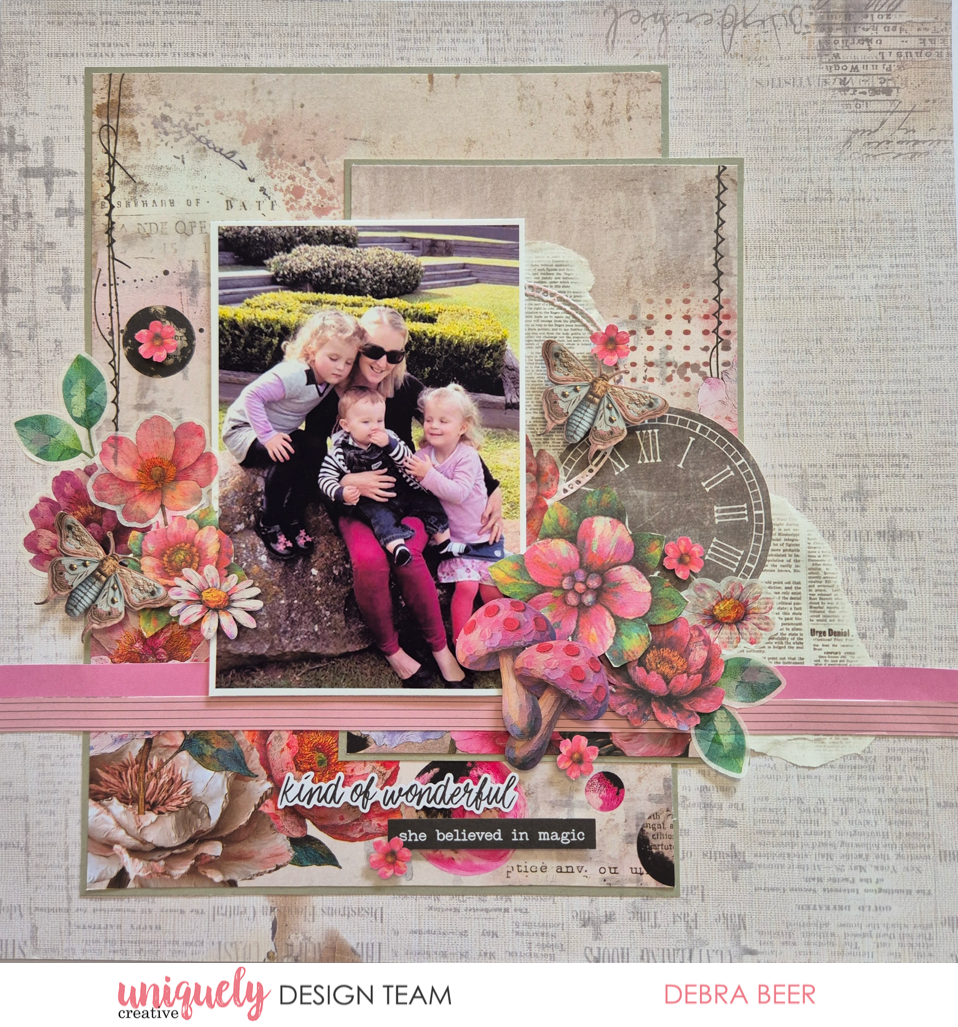

To recreate this beautiful layout created by Design Team member Debra Beer you can follow the steps below:
Uniquely Creative Products Used:
· UPC 3026 Once Upon a Dream Paper
· UPC3027 Kind of Lovely Paper
· UCA1771 Sage coordinating Cardstock
· UPC3033 Dressed in Daydreams Cut-a-Part Sheet
· UCP3037 Dressed in Daydreams Vellum Cuts
· UPD2213 Sewn and Stitched Dies
· UC1932 Random Crosses Stamp
· Uniquely Creative Fussy Cutting Scissors
Other Products Used:
· Die Cutting Machine
· Foam Mounting Tape, Double Sided Tape
· Glue
· Archival Ink Shadow Grey
Photo size: 4" x 6"
Step 1:
Using Once Upon a Bloom paper cut two rectangles, one 10 ½ x 7 ¼ inches, the other 7 ½x5 inches. Using Sage cardstock cut one rectangle 103/8 x 75/8 inches.
Step 2:
Adhere the two patterned pieces to the sage cardstock. Overlap the rectangles and adhere to Kind of Lovely base page. Using the identifier strips from both pages ,adhere roughly 31/4 inches from the bottom of the page, butting them together. Add Photo.
Step 3:
Use the stamp and grey ink in the places on your layout, once on the left side and twice Tear the two print sections from on the lower right section, referring to the main photo.
Step 4:
Tear the two print sections from the A5 creative paper, butting up against the right side of the photo, and the other piece to the edge of the smaller rectangle, adhere in place using a little glue. Cut the smaller clock from the creative paper, adhere, tucking under photo. Cut stitched circle die cut in two, tucking under photo and overlap clock. Create clusters on both sides of photo as main photo, using vellum cuts (backing removed) and creative cuts mounted on foam tape. Lastly, add Two Title stripe using foam tape.