MERRY CHRISTMAS LAYOUT TUTORIAL - KYLIE KINGHAM

Welcome to our September Collection - Home For Christmas!
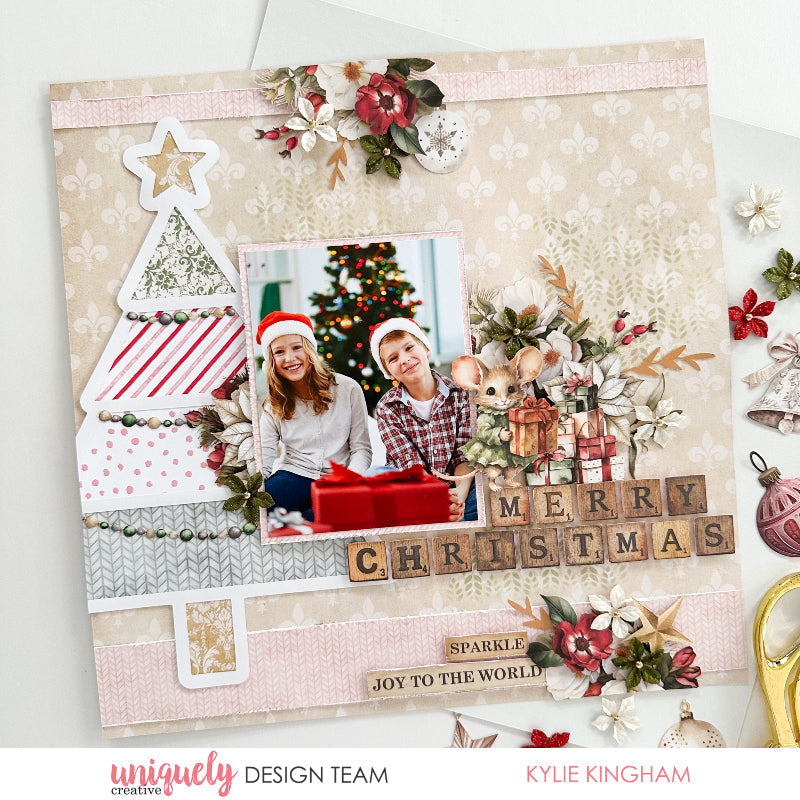
To recreate this fantastic festive layout created by Design Team member Kylie Kingham you can follow the steps below:
Uniquely Creative Products Used:
· UCP2985 From Our House Paper
· UCP2986 Where The Heart Is Paper
· UCP2987 Little Traditions Paper
· UCP2989 Holly In The Hall Paper
· UCP2991 Night Before Paper
· UCP2992 Ready For Santa Paper
· UCP2996 Creative Cuts
· UCMM1791 Festive Tidings Stencil
· UCE2131 Christmas Tree Overlay
· UCE2121 Flowers
· UCE1803 Foam squares & Strips
Other Products Used:
· Scissors, ruler, pencil, glue
· Distressed Oxide - Bundled Sage
Photo Size: 4” x 5.25”
Step 1:
Trim the barcode strip from the LITTLE TRADITIONS paper. Trim 2 strips of WHERE THE HEART IS paper to measure 0.5” x 12” and 1.5” x 12”. Distress the edges of the strips and adhere to the background. Thinner strip to the top and the wider at the base – Allow 0.25” from the edges. -See image 1
1. Step 2:
Use papers FROM OUR HOUSE, LITTLE TRADITIONS, HOLLY IN THE HALL, NIGHT BEFORE & READY FOR SANTA to back the Christmas Tree overlay. Place it face down on the reverse of each paper before tracing around the inside edge of each section.
Step 3:
Cut out each section a little larger than the trace lines and glue each piece face down on the back of the Tree. - See image 2
Step 4:
Adhere the Tree to the left side of the layout, overhanging the edge just a little. Trim away the overhang.
Step 5:
Add detail to the background using the Festive Tidings stencil with Bundled Sage Distress Oxide & a blending brush – See image 3
Step 6:
Mat the photo with a distressed piece of 4.25” x 5.5” WHERE THE HEART IS paper. Add to the layout with foam squares. Fussy cut each square of the title on the READY FOR SANTA paper. Adhere to the layout with foam squares – Using a ruler will ensure you get each square straight. -See image 4. Complete the layout by adding Creative Cuts and flowers.
