POP OUT BELLY BAND CARD TUTORIAL - PAULA SAUNDERS

To recreate this beautiful card created by Design Team member Paula Saunders you can follow the steps below:
Uniquely Creative Products Used:
· UCP3138 Oh Sweetie Paper
· UCP3141 Oh Pretty Thing Paper
· UCP3148 Oh So Lovely Creative Cuts
· UCE1728 Iridescent Pearls
· UCE2192 Paper Perfect Quick Dry Glue
· Foam Mounts Dots & Strips
Other Products Used:
· 12x12 Cardstock – White
Card size: 10cm x 15cm
Step 1:
Trim a piece of white cardstock to measure 6 x 10”. Place the long side at the top of your scoreboard & score at 1, 3, 7 & 9”. Fold on the scorelines. Starting from the left with a mountain fold, valley fold, valley fold, & mountain fold.
Step 2:
Trim two pieces of the OH SWEETIE UCP3138 paper, (side B) & trim to measure ¾ x 5 ¾”, adhere to the two 1” flaps on the front of your closed card (panels 1 and 5). Find the OH PRETTY THING UCP3141 paper, (side B), & trim two pieces to measure 1 ¾ x 5 ¾”. Adhere to the 2” panels inside your card (panels 2 and 4).
Step 3:
Find the left-over piece from step 2 & trim the B side to measure 3 ¾ x 5 ¾” (try & get as much of the flowers as possible at the top of this piece) & adhere to the middle panel – See image 1

Step 4:
Trim two pieces of the left-over paper from step 3 to measure 1 ¾ x 5 ¾” & adhere (B side) to the two ½” panels on the outside of your closed card (panels 2 and 4).
Step 5:
Trim a piece of white cardstock to measure 3 ¼ x 7 ¼”. Place the long side at the top of your scoreboard & score at ½, 1, 6 ¼ & 6 ¾”, fold on the scorelines. Place adhesive on the very top & very bottom panels & adhere to the middle inside of your card (lining up at the bottom of the card) to form a raised section, this is your 3D panel
Step 6:
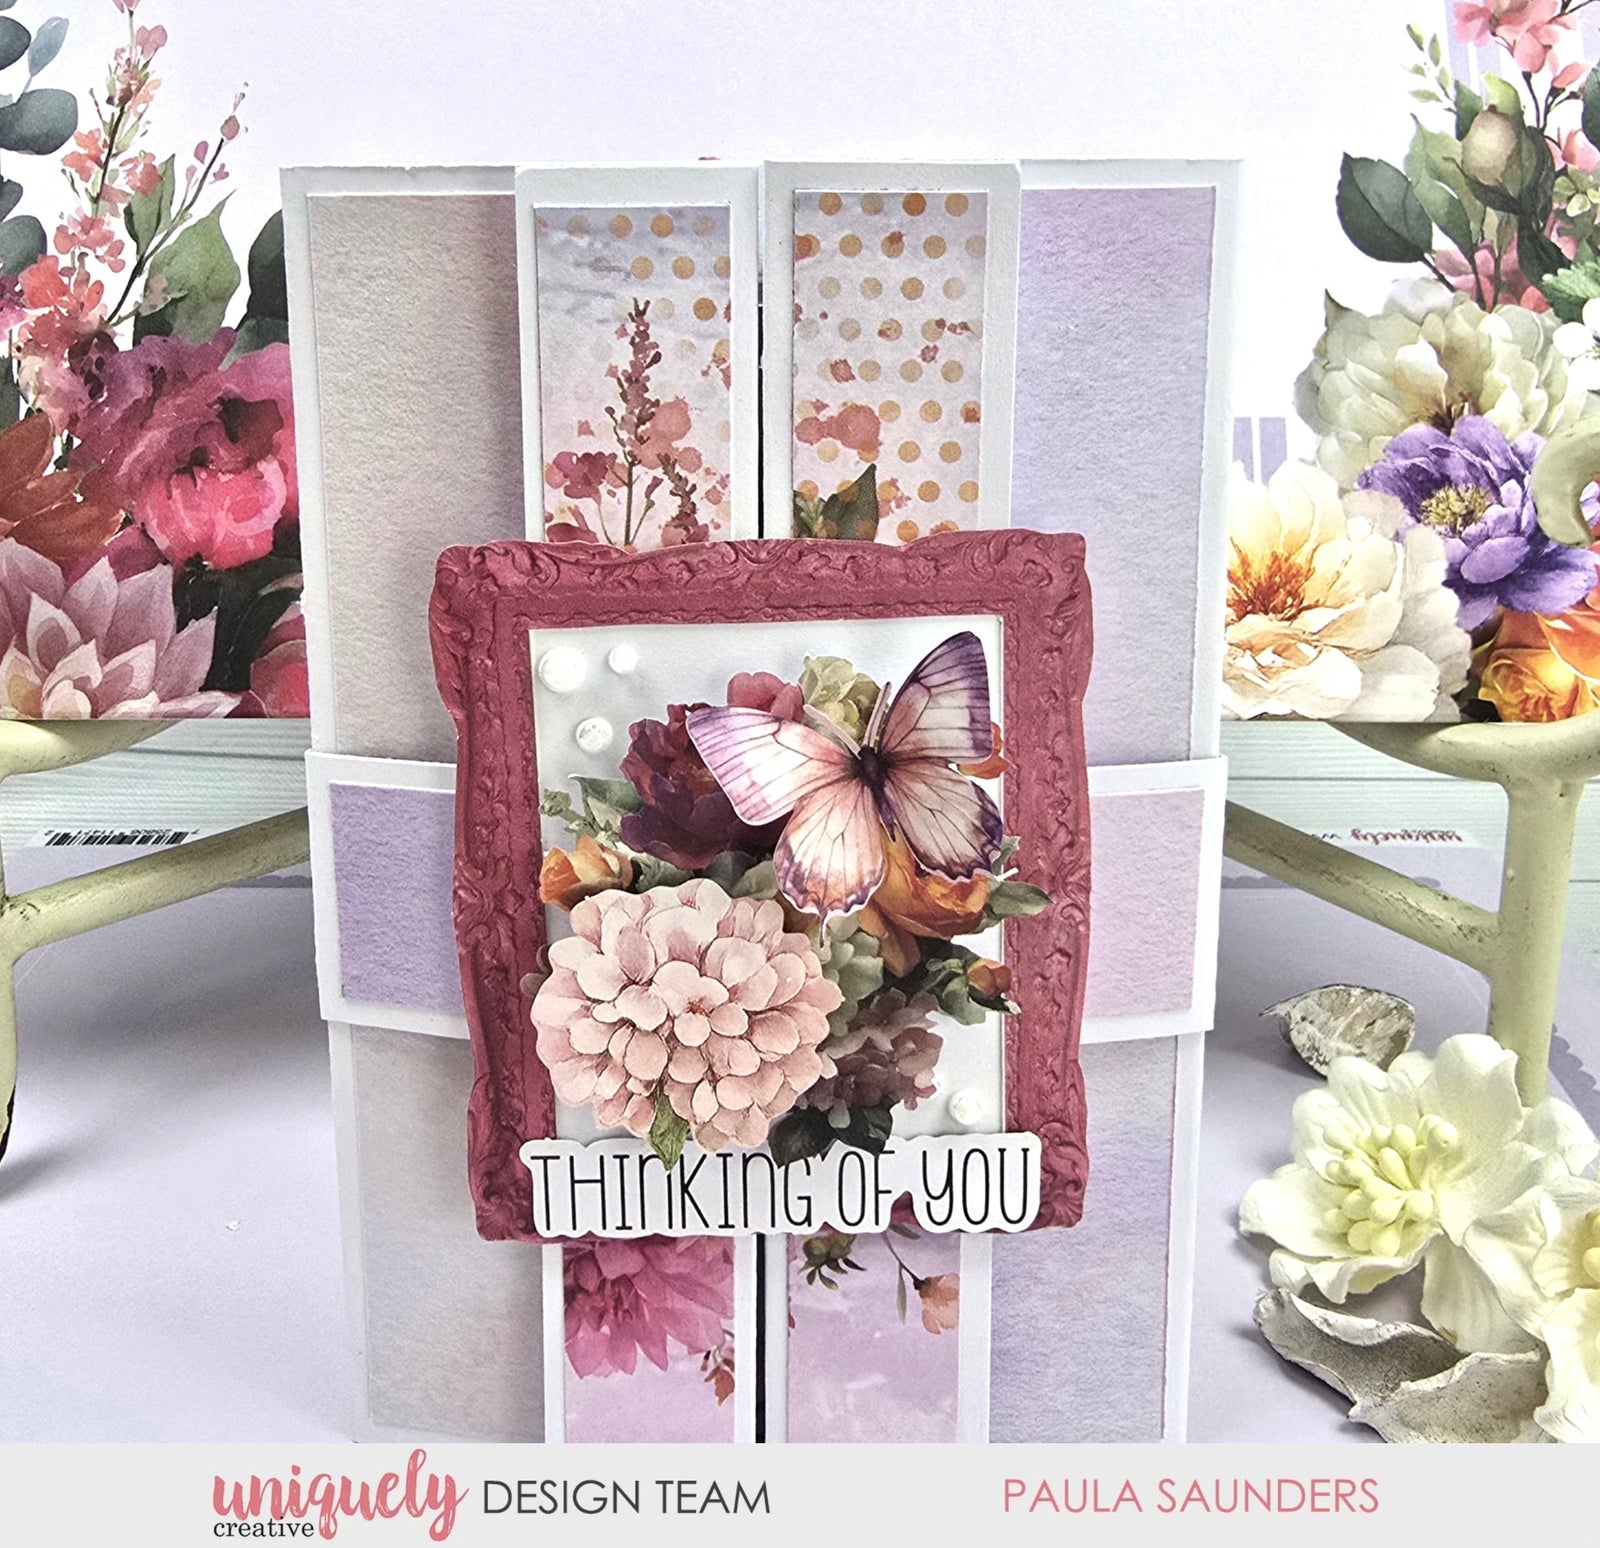
Find the left-over paper from step 3 & trim the B side to measure 3 x 5” and adhere to the 3D panel. Trim another piece of white cardstock to measure 2 ½ x 4 ½”. Adhere to the 3D panel on the inside of your card. This is your writing space. Adhere a flower from the CREATIVE CUTS - See image 2
Step 7:
Trim a piece of white cardstock to measure 1 ¼ x 11 ½”, wrap it around your closed card (not too tight as you need to be able to slip it off easily) & adhere the ends together. This is your belly band. Trim a piece of left-over paper from step 3 (B side) to measure about 1 x (depending on the size of your bellyband) 3 ¾”, adhere to the front of your belly band
Step 8:
Adhere one of the pink frames in your CREATIVE CUTS pack to some left -over white cardstock & adhere to the front of your belly band
Step 9:
Use some elements from the CREATIVE CUTS pack to decorate the frame. Adhere some of the IRIDESCENT PEARLS to the front – See image 3
Step 10:
Adhere the THINKING OF YOU from the CREATIVE CUTS pack to the bottom of the flowers on the bellyband
