SHE BLOOMS WILDLY LAYOUT TUTORIAL - MARIA ALOISI
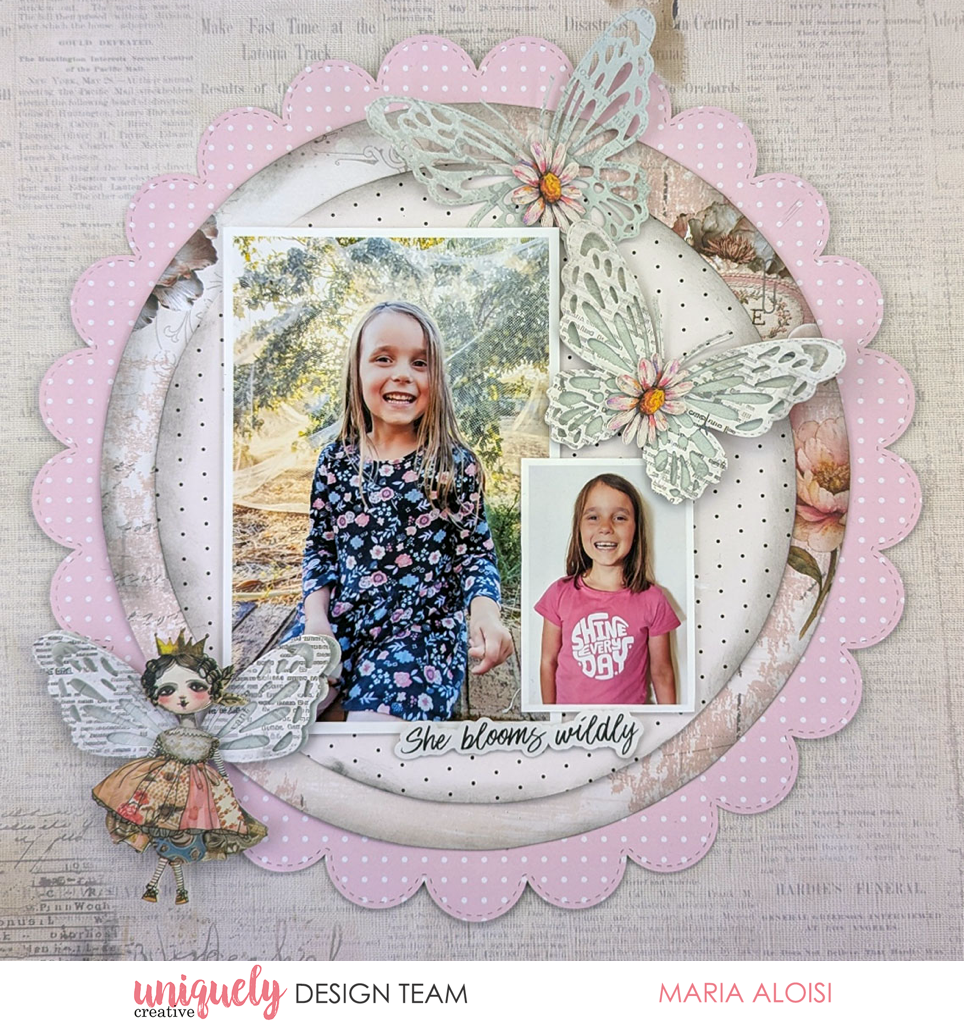

To recreate this gorgeous layout created by Design Team member Maria Aloisi you can follow the steps below:
Uniquely Creative Products Used:
· UCE2156 Scalloped Decorative Base Layer
· UCP3023 Notes of Grace Paper
· UCP3024 The Story Beneath Paper
· UCP3025 Dream Street Paper
· UCP3027 Kind of Lovely Paper
· UCP3033 Dressed In Daydreams Creative Cuts
· UCD2214 Wings of Grace Butterfly Die
· UCE1872 Fussy Cutting Scissors
· UCE1859 6mm Double Sided Tape
· UCE1803 Foam Mounts Squares & Strips
· UCE1778 Blending Brush, black ink
Other Products Used:
· Die cutting machine
Photo sizes: 1 x 4"x6" & 1x 2"x3"
Step 1:
Remove the branding strip from the Kind of Lovely paper and use the reverse side as the base page. Using double sided tape, add the scalloped decorative base layer to the centre of the page.
Step 2:
Cut two circles from the Notes of Grace papers. One circle is 71/2" in diameter and the other is 9" in diameter. Using double sided tape, add the circles on top of the scalloped base layer. Add the photos using foam mounts.
Step 3:
Die cut two butterflies and one butterfly outline using the Dream Street paper and the Wings of Grace Butterfly die. Die cut two additional butterfly outlines using The Story Beneath paper.
Step 4:
Using foam mounts, add a floral creative cut to the centre of the Dream Street butterfly outline. Using glue, add The Story Beneath butterfly outline to the Dream Street butterfly. Add a floral creative cut. Add The Story Beneath butterfly outline to the Dream Street butterfly. Remove the lower wings. Using foam mounts, add the trimmed wings to a paper doll creative cut.
Step 5:
Add the butterflies and the paper doll to the base page.
Step 6:
Ink blend the edges of the circles using black ink.