Thank You Tutorial - Natalie Elphinstone

Uniquely Creative Products Used:
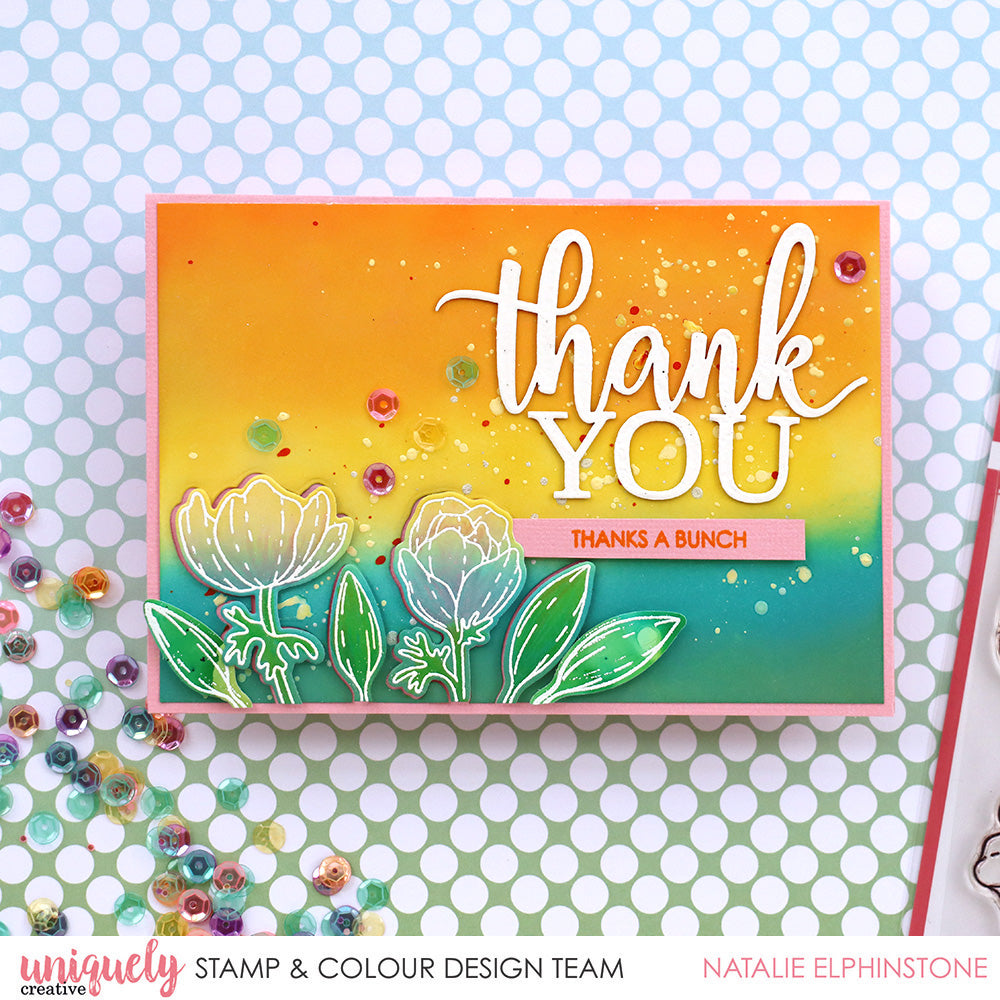
UC1809 Pretty Amazing Stamp, UCD1922 Pretty Amazing Die, Lasercut “Thank You”, Crystalline Sequins, UCE1804 Foam Dots, UCE1778 Blending Brushes
Other Products Used:
Distress Oxide Inks, Prismacolour Pencils, Versamark Ink, White Embossing Powder, Spray Ink
Instructions:
1. Cut a panel of smooth white cardstock or blending card just slightly smaller than your 6" x 4” pink card base. Blend a background using Distress Oxide inks and your Uniquely Creative Blending Brushes. Achieve a bit of a ‘grassy field and sunset sky’ kind of look with some greens down the bottom and a yellow/orange blend at the top.

2. Now here’s where a stamp-positioning tool like the Misti comes in handy. Line up some of the flowers and leaves from the Pretty Amazing stamp set on my Mini Misti – stamp along the bottom left of your coloured panel. Natalie used a subtle ink colour like a soft beige so that she could see the images, but they would blend away when she coloured them in. You can use Prismacolour Pencils to do just that.
Important thing to remember at this stage… don’t remove the stamps from the Misti yet!

3. And here’s why! Now that the coloured images line up with the background panel, stamp with Versamark ink. Sprinkle white embossing powder over the top and then heat set it.

4. Cut out the images with the matching die set. Natalie also ended up stamping and cutting some more leaves from a separate set of paper to fill in some of the gaps between the flowers a bit more.

5.To create a bit more of an interesting background Natalie took some of her (super old!) spray inks and splattered them across the ‘sky’. It’s a subtle enough detail, but it does make a huge difference!

6. When it’s all dry, adhere the background panel onto the pink card base. Use foam tape to adhere the flowers and leaves back into their position. Adhere so they were just marginally off-kilter from their original ‘holes’ – that allows just a sliver of the pink background colour to be seen.
To finish it off I added the large lasercut “thankyou” which I heat-embossed with the same white embossing powder as my flowers, a simple strip with a stamped sentiment on it, and some Crystalline Sequins for good measure.
