THE SEA IS CALLING CARD TUTORIAL - SHANNAH BARTLE

To recreate this stunning card created by Design Team member Shannah Bartle you will need the products listed below:
Shop the products
Uniquely Creative Products Used:
- UCP2836 Waves for Days paper
- UCP2838 To the Beach paper
- UCP2840 Coastal Bliss Creative Cuts
- UCP2844 Coastal Ephemera
- UCE2042 Natural Muslin
- UCE1882 Chantilly Pearls
- UC Forest Cardstock
- UCE1872 Fussy Cutting Scissors
- UCE1986 Edge Distressing Tool
- lUCE1935 Craft Tweezers
- UCE1775 Watercolour cardstock
Other Products Used:
- Trimmer, score tool
- Double-sided tape, foam tape and glue
- Walnut Stain Distress Oxide ink
- White 14.5cm square card
Instructions:
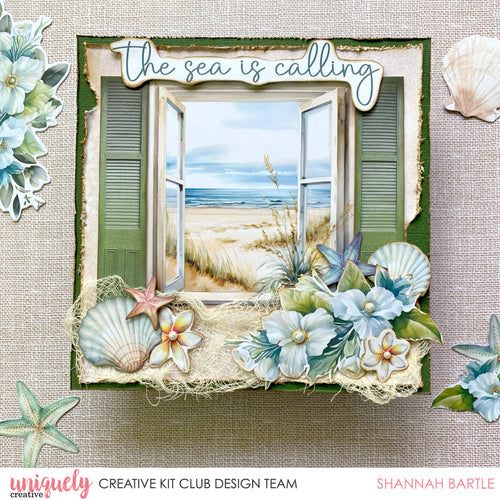
- Cut a piece of green cardstock to 14.5cm square. Lightly distress the edges and attach to a 14.5cm card front.
- Trim a 14cm square of Waves for Days paper. Distress and tear the edges, then ink with Walnut Stain Distress Oxide ink. Layer onto the green cardstock – See image 1.

- Fussy cut the window image from To the Beach paper. Select green shutters from the Creative Cuts and trim down the centre – See image 2

- Adhere the window image slightly above the centre of the card. Add half of the shutter either side of the window using foam tape for dimension – See image 3.

- Cut a piece of natural muslin, and scrunch and pull at the edges a little. Add a few drops of liquid glue across the bottom of the card then lay the muslin lightly across it – See image 4.

- Fussy cut a sentiment and floral cluster from To the Beach paper. Also select two flowers from the Creative Cuts and three pieces of Coastal Ephemera. Ink all the edges – See image 5.

- Arrange the images in the bottom left and bottom right of the card using foam tape – See image 6.

- Attach the sentiment across the top of the window using foam tape.
- Add some Chantilly pearls around the card to finish - See image 7.

