Birthday Wishes Tutorial - Shannah Bartle
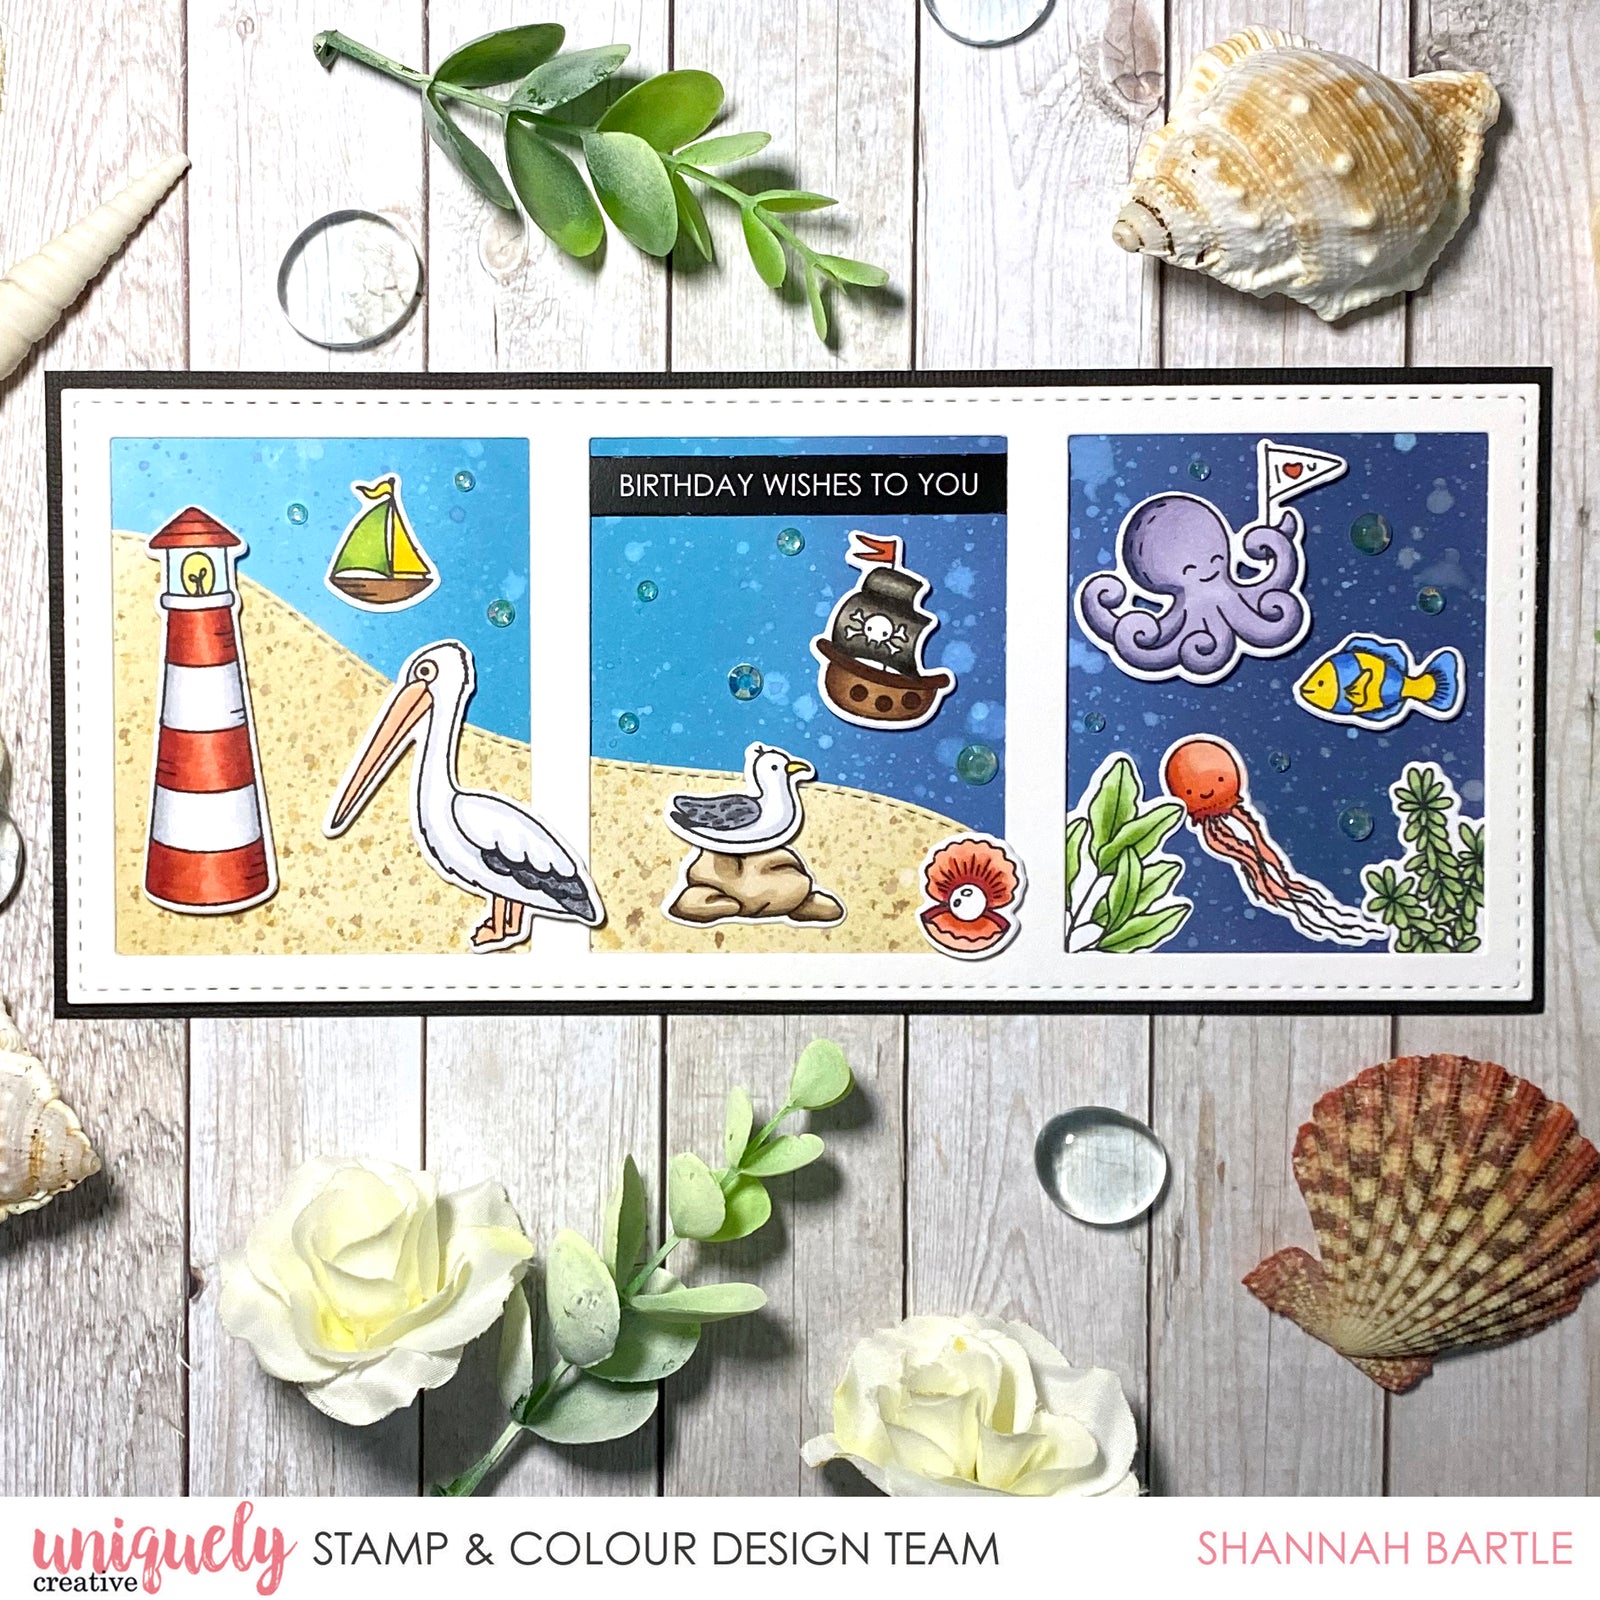

Card Size:
8.8cm x 21cm (Uniquely Creative Slimline card)
Uniquely Creative Products Used:
UC1845 Under the Sea Stamp, UCD1996 Under The Sea Die, UC1846 Sea Treasures Stamp, UCD1997 Sea Treasures Die, Cut-A-Part Sheet, UCD1964 Slim 3 Window Die, UCD1958 Cut-A-Part Essentials #5 Die, UCD1859 Grassy Hills Die, Watercolour Cardstock, Mint Rhinestones, Slimline Card, Foam Mounts.
Other Products Used:
Smooth White & Black Cardstock, Tumbled Glass, Broken China, Faded Jeans & Chipped Sapphire Distress Oxide inks, Antique Linen, Frayed Burlap & Walnut Stain Distress Inks, Water Spray Bottle, Sponging Tool, Paint Brush, Craft Mat, Trimmer, Scissors, Adhesives, Die Cutting Machine, Heat Tool.
Copic Colours:
Lighthouse – R22, R24, R27, R29, B00, Y32, C00, C1, C3
Pelican & Seagull – W00, W1, W3, W5, W7, W9, R20, R01, Y19
Sailboat – YG03, YG17, Y11, Y19, E23, E25, E27
Pirate Ship – E23, E27, E29, W3, W5, W7, W9, R24
Octopus – BV00, BV11, BV13, BV17
Jellyfish & Shell - R12, R14, R20, R22, R24, R27
Fish – B21, B24, B28, Y11, Y19
Green Seaweed – YG01, YG03, YG23, YG17, G20, G24, G28
Rocks – E41, E42, E43, E44, E47
Instructions:
1. Cut two pieces of smooth white cardstock, 8.3cm x 20.5cm and 8cm x 16cm.
2. Sponge rows of Tumbled Glass, Broken China, Faded Jeans & Chipped Sapphire Distress Oxide inks onto the larger piece of cardstock, beginning at the top and blending well between the colours.
3. Flick with water droplets and press off with paper towel. Mix a small amount of Broken China & Faded Jeans inks with water and flick over the background then allow to dry.

4. Sponge Antique Linen Distress ink over the smaller piece of cardstock. Die cut a Stitched Hill across the top then, sponge Frayed Burlap around the edges.
5. Mix a small amount of Frayed Burlap and Walnut Stain Distress ink with water and flick over the background, then allow to dry.

6. Adhere a 9.3cm x 21.5cm piece of black cardstock to the card front and set aside.
7. Die cut a Slim 3 Window die from watercolour cardstock.

8. Layer the sandy piece over the water background at an angle, then use the edges of the Slim 3 Window die cut piece to trim away the excess. Adhere the layers into place with double-sided tape.

9. Stamp a variety of Under the Sea and Sea Treasure images onto blender card and colour with Copic markers. Die cut using the coordinating fussy cut dies.

10. Arrange the images onto the card front, using a combination of double-sided tape and foam mounts for dimension.
11. Die cut a sentiment using the Cut-apart Essentials #5 die and adhere across the top centre panel, tucking the ends under the frame either side.

12. Add some Mint rhinestones around the background, then adhere the entire panel to the card front to finish.

Bonus Inspiration Card - Smile

Card Size:
11.5cm x 16cm
Uniquely Creative Products Used:
UC1845 Under The Sea Stamp, UCD1996 Under The Sea Die, UC1846 Sea Treasures Stamp, UCD1997 Sea Treasures Die, Cut-A-Part Sheet, UCL1718 Laser Cut, UCD1999 Scene Builder #1 Die, Mint Rhinestones, Rectangle Card, Foam Mounts.
Other Products Used:
Smooth White Cardstock, Bazzil White & Admiral Cardstock, Speckled Egg, Salvaged Patina, Mermaid Lagoon, Faded Jeans & Chipped Sapphire Distress Oxide Inks, Picket Fence Distress Paint, Water Spray Bottle, Sponging Tool, Paint Brush, Craft Mat, Trimmer, Scissors, Adhesives, Die Cutting Machine, Heat Tool.
Copic Colours:
Seal – C00, C1, C3, C5, C7, C9, R20, RV34
Lighthouse – R22, R24, R27, R29, B00, Y32, C00, C1, C3
Pelican & Seagull – W00, W1, W3, W5, W7, W9, R20, R01, Y19
Rocks – C1, C3, C5, C7
Bev Page
September 11, 2021
Thanks so much for sharing Shannah. Love both of your sweet and very cute cards. Such a lovely stamp set – all the stamps make me smile. Thanks for the very clear instructions as well, as they are very helpful. Would love all you ladies to make Youtubes though.