CELEBRATE YOU CARD TUTORIAL - SHARON BERNARDI

To recreate this beautiful card created by Design Team member Sharon Bernardi you can follow the steps below:
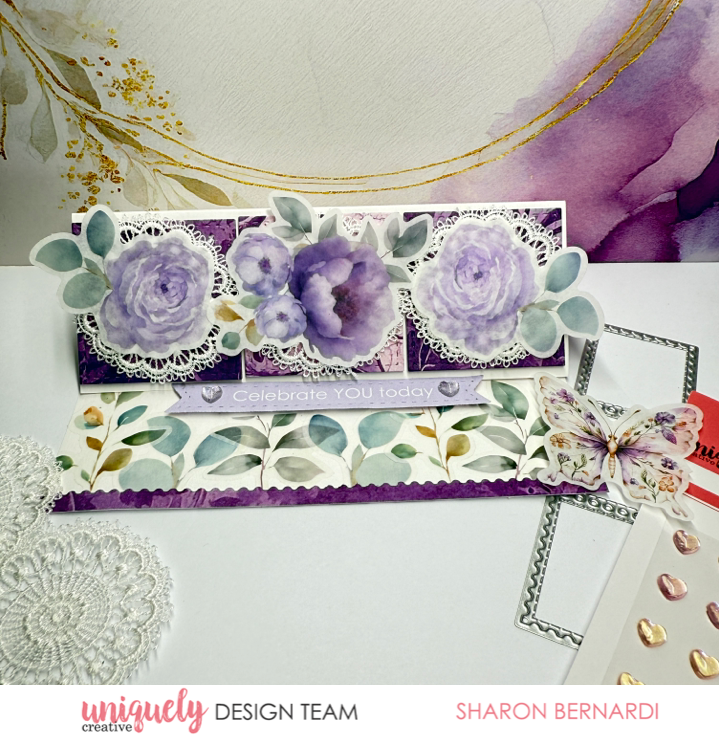
Uniquely Creative Products Used:
· UCP3066 Magical Mauve Paper
· UCP3074 Ultraviolet Delight Vellum Creative Cuts
· UCCS229 Ultraviolet Delight Cut-a-part
· UCE2185 Dew Drop Heart Stickers - Romantic
· UCD2226 Postage Stamp Strip Die
· UCD2182 Cut-a-part Essentials Die #10
· UCE20553 Whimsical Lace Pieces
· UCE1811 Rectangle Cards & Envelopes
· UCE1858 3mm Double Sided Tape
· UCE1859 6mm Double Sided Tape
· UCE1803 Foam Mounts Squares & Strips
· UCE1916 Fine Glue Pen
Other Products Used:
· Trimmer
· Die cutting machine
Card size: 13.5cm x 13.5cm
Step 1:
Using the Cut-a-part Essentials Die #10, cut some squares from the Magical Mauve paper. Sit these aside.
Step 2:
From the Cut-a-part Sheet, use the Cut-a-part Essentials Die #10 to cut the sentiment. Adhere a Foam Strip to the back of the sentiment.
Step 3:
With the card in landscape position so that it opens from the bottom long edge, score the front panel of the card in half so that it stands up when folded and creates a triangle opening when looking from the end. Adhere the sentiment 1½” from the bottom edge of the base panel of the card. Select an assortment of Vellum Creative Cuts and adhere to create an overlapping foliage design along the bottom. (Remove the backing to reveal the adhesive) Cut some as needed to fit around the sentiment.
Step 4:
From a scrap of Magical Mauve paper, use the outside edge of the Postage Stamp Strip Die to cut a border. Adhere a strip of 3mm Double Sided Tape along the bottom of the card to cover the stems of the Vellum Creative Cuts foliage pieces and adhere the die cut edge. Turn card over and trim off excess paper. Using oam Squares, adhere the three die cut squares from Step 1 to the folded panel. 
Step 5:
Arrange Foam Squares on the back of Lace Pieces and adhere to each square firmly.
Step 6:
Select floral elements from the Vellum Creative Cuts. Without removing the adhesive backing on each, adhere with glue to the Lace Pieces. The glue will push through and secure the Foam Squares to the Lace Pieces also. Add some Dew Drop Heart Stickers to the sentiment strip to finish.
Molly
March 10, 2026
I love this card, easy to follow each step. Thank you 💕