Circle Cards Tutorial - Natalie Elphinstone

Card Size: Uniquely Creative Rectangle Card (10.5 x 14.8cm), Uniquely Creative Slimline Card (8.8 x 21cm)
UC Products Used:
UCD1841 Owl Family Stamp Set, UCD1982 Owl Family Die Set, #6 Essential Cut-A-Part Essentials, Cut-A-Part Sentiments Sheet, UCE1803 Foam Tape, UCE1818
Other Products Used:
White Cardstock, Coloured Paper, Coloured Brads, Ink
Instructions:
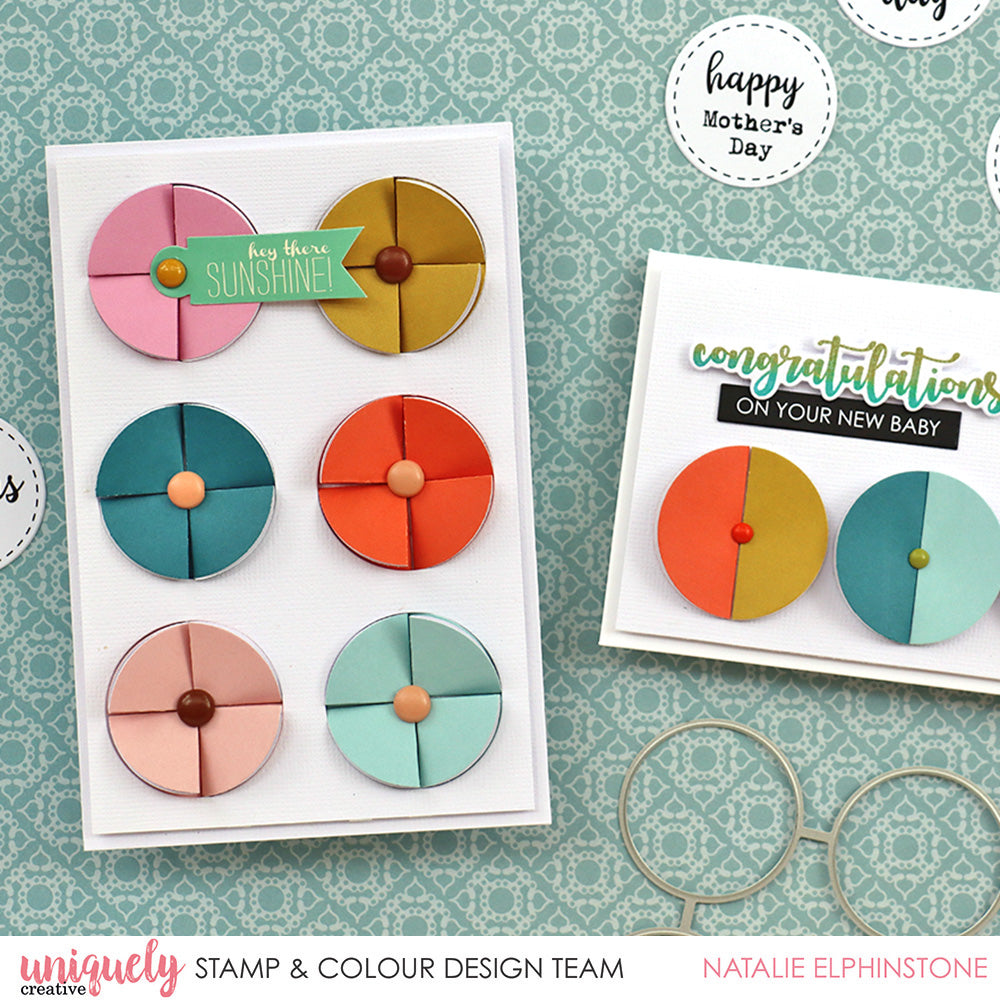
Natalie loves the new-release stamp sets for April, especially the new #6 Cut-A-Part Essential die with it’s 6 circles that really set her imagination alight. It’s actually designed to be able to cut your Cut-A-Part sheets out in a single run through your die cut machine. There are so many other possibilities with this simple die. Below Natalie shares a couple of ideas with you all.

1. Natalie started her first card by choosing a bold colour scheme of 6 coloured "papers" as well as a piece of white cardstock. Using the #6 Cut-A-Part Essentials die cut out each one. Using a little bit of washi-tape helps to secure the die in place on the white cardstock to make sure it stays centred.

2. You'll now have 6 circles in each colour, but you’ll only need 4 of each. Save the other 2 for the next card! First fold each circle in half, and then quarters using a bone folder, this will also give a nice crisp and clean fold. This is why you want to use paper for this step, cardstock would be too thick to fold like this.

3. Each of the 4 quarters will become like a flower petal. You could consider mixing and matching them all up, but ultimately decided to stick with each flower being the same colour. Natalie also found it more pleasing to arrange the petals so that each fold opens in a different direction – so it looks like a windmill.
Attach foam tape to the white ‘holey’ cardstock panel to the white folded card underneath. Then I put some double-sided tape in the centre of each hole, and stuck in my flower petals one by one.

4. Using a craft knife cut a tiny slit in the centre of each flower, place a coloured brad through, which will give a great contrast of colour, this also helps secure the brad in place as well.

With the left over circles, Natalie decided to stick with a similar theme for a second card.
This time Natalie made a Slimline Card, by simply folding the circles in half. Natalie started by lining them up along the bottom of the card, and using the same coloured brads to hold them in place again. Die cut a combination of stamped sentiments from the ‘Owl Family’ stamp set, as well as a Cut-a-part word strip and attach.
