DREAM A LITTLE DREAM LAYOUT TUTORIAL - PAULA SAUNDERS

To recreate this amazing layout created by Design Team member Paula Saunders you can follow the steps below:
Uniquely Creative Products Used:
· UCP2896 Woven Threads Paper
· UCP2902 Jelly Roll Paper
· UCP2903 Layer Cake Paper
· UCE2092 Puffy Stickers
· UCE2093 Fabric Scalloped Borders
· UCP2906 Creative Cuts
Other Products Used:
· UCE1872 Fussy Cutting Scissors
· Trimmer, scissors, ruler
· Double-sided tape, foam tape, glue
· Black Spray
· White Cardstock 12x12”
· Black Pen
Photo Size: 4x6"
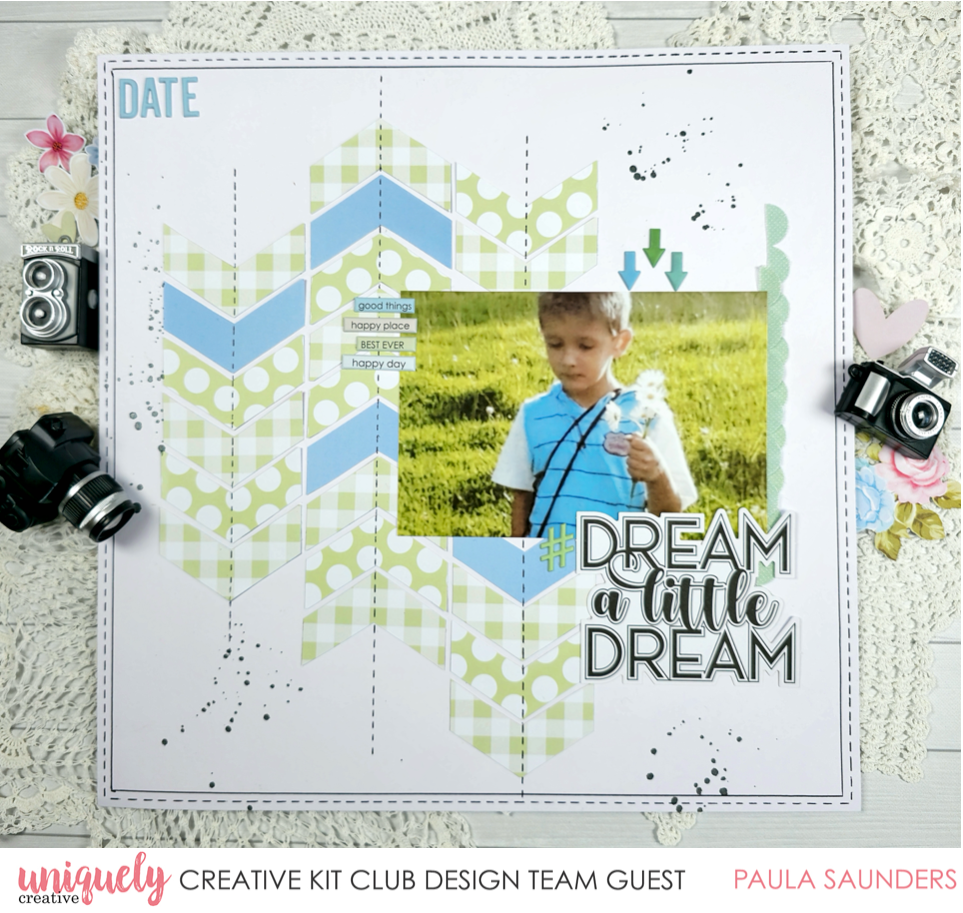
Step 1:
Take a scrap piece of cardstock, trim to measure 2 ¼ x 1 ½” & make a chevron template. See figure 1 for measurements
Step 2:
Find the UCP2903 Layered Cake (blue side showing) paper & trim four pieces to measure 2 ¼ x 1 ½” & use the chevron template to cut out four blue chevrons
Step 3:
Find the UCP2896 Woven Threads (green checkered side showing) paper & trim 10 pieces to measure 2 ¼ x 1 ½”, use the chevron template to cut out
Step 4:
Find the UCP2902 Jelly Roll (green dot side showing) paper & trim seven pieces to measure 2 ¼ x 1 ½”, use the chevron template to cut out
Step 5:
Adhere the chevrons as shown in figure 2
Step 6:
Use a black pen & draw faux stitching through the center of the chevrons & around the outside of the layout. Fig 3
Step 7:
Trim two pieces of the Fabric Scallop Borders, one to measure about 4 ½” & one about 6 ½”, adhere to the right side of your landscape photo slightly overlapping the scallops & off center. Adhere the photo to the middle of your layout. Fig 4
Step 8:
Find the words DREAM A LITTLE DREAM from the Creative Cuts pack & adhere to the bottom right of your landscape photo. Fig 5
Step 9:
Adhere the Puffy Stickers as shown in figure 5
Step 10:
Use a scrap piece of paper to cover up any places you don’t want the splatter to go on & use the nozzle of a black spray bottle or watered down acrylic paint & splatter onto your layout as shown in figure 6
Kristina
May 19, 2025
What a gorgeous layout! Thank you for sharing the instructions and photos to make this – I’m looking forward to trying out the fabric borders.