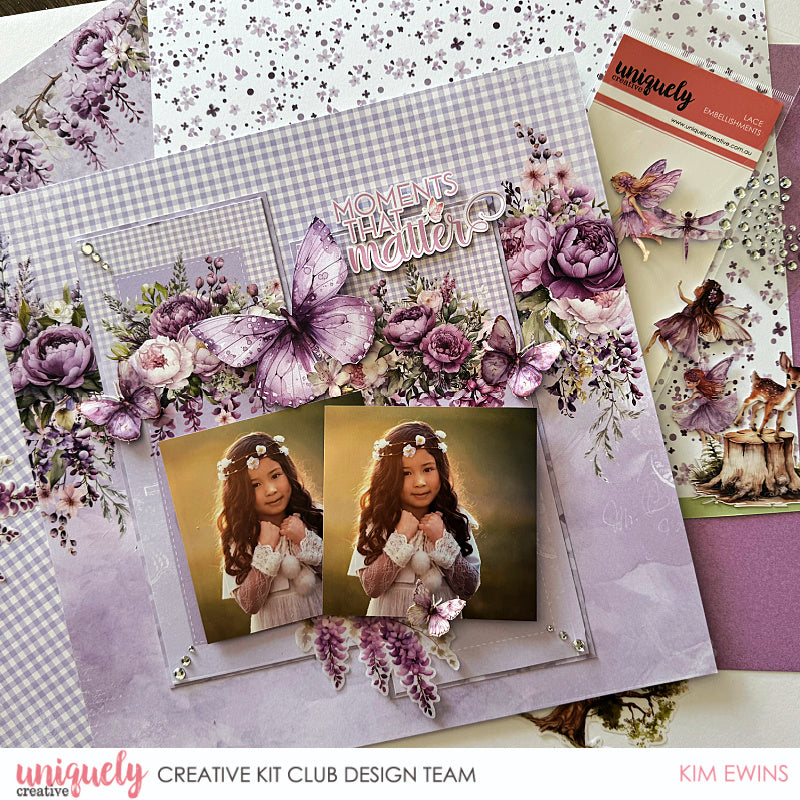
MOMENTS THAT MATTER LAYOUT TUTORIAL - KIM EWINS

To recreate this gorgeous layout created by Design Team member Kim Ewins you will need the products listed below:
Uniquely Creative Products Used:
UCP2870 Harmony Paper
UCP2876 Essence Paper
UCP2877 Radiance Paper
UCP2894 Serenity Creative Cuts
UCP2895 Serenity Vellum Creative Cuts
UCE2086 Serenity Slimline Fold-Out Album
UCE1726 Silver Bling
Other Products Used:
Scissors, trimmer
Adhesive, double sided tape,
Cardboard, foam mounts
Photo size: 2 photos – 4” x 4”
Instructions:
Step 1:
Use the Harmony paper as the layout base
Step 2:
Take the Slimline Fold-Out Album and open it out fully, flower side up.
Step 3:
Trim off first & last sections.

Step 4:
Using Essence paper cut 2 matt measuring 4” x 9”.
Step 5:
Adhere sections of album to the cut matts, making sure borders are even.
Step 6:
Adhere the 2 pieces to the base paper.
Step 7:
Add cardboard or foam mounts to the back of photos and adhere to layout just below flower design.
Step 8:
Fussy cut a large butterfly from Radiance paper.
Step 9:
Take 3 butterflies from Serenity Creative Cuts pack, plus a sentiment and a small flower.
Step 10:
Grab a Wisteria piece from the Serenity Vellum Creative Cuts pack.
Step 11:
Adhere large butterfly & small flower above photos and add the others.
Step 12:
Stick Wisteria below photos in roughly the centre, slightly tucking under lower edge of photo.
Step 13:
Adhere sentiment.
Step 14:
Add varying sizes of Silver bling.