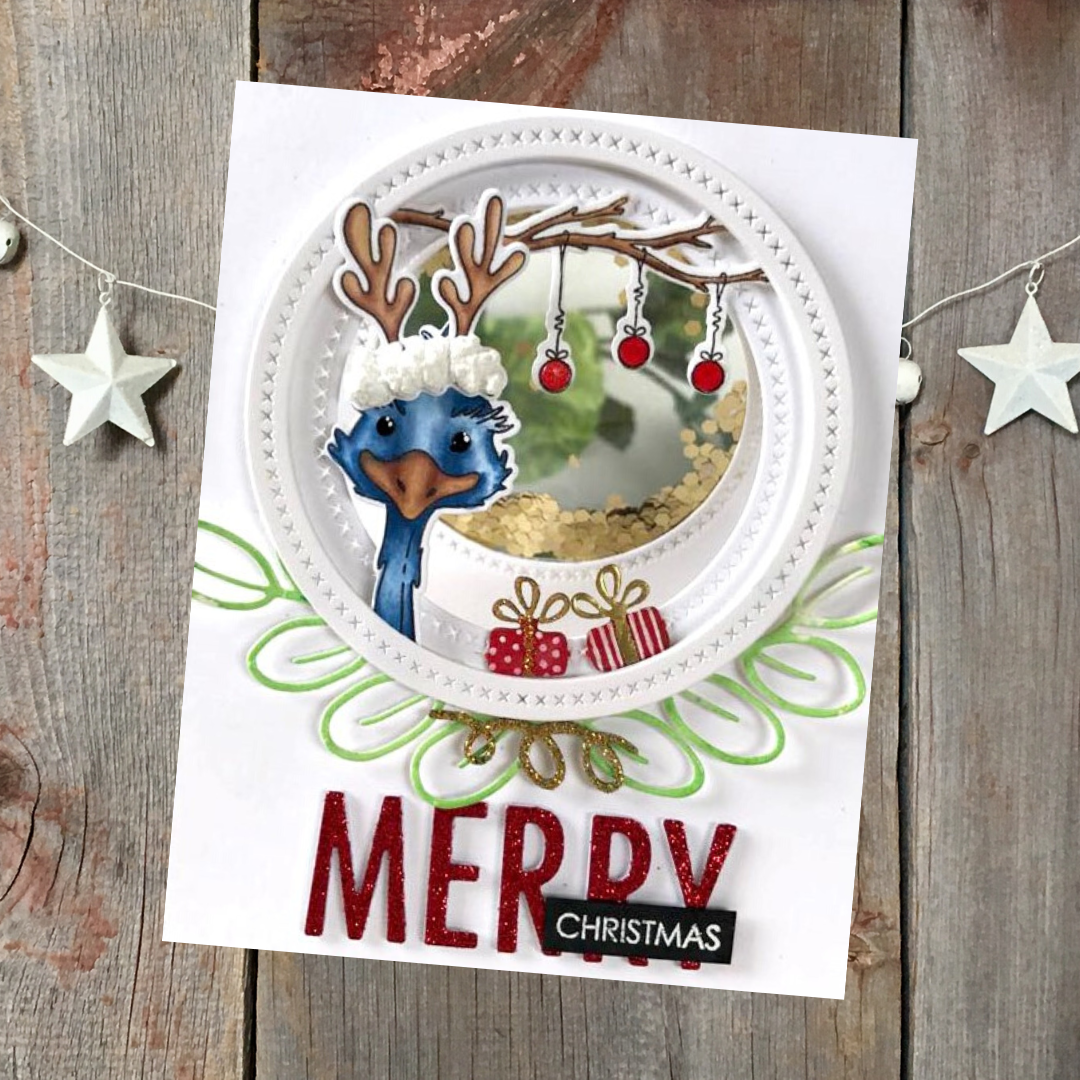
See Through Merry Christmas Shaker - Chick Mitchell

Uniquely Creative Products Used
Aussie Christmas stamp and die set, chipboard gift elements included in the kit, Cross Stitched Nesting Circle die set, Tall Alphabet die set, Large Leaves die set.
Other Products Used
Gold, Gold Sparkle and White embossing powders, Festive Berries Distress Oxide Ink, Falling Leaves Nuvo Shimmer Powder, Nuvo Gold Hexagon Confetti, Ranger Embossing Pen, Nuvo Shimmer Pen and Crystal Glaze
Colours Used
Copic Markers: B37, B34, B32, E25, E34 E31
Eyes - black and white Sakura Gel pens
Antlers - Tsukeniko Radiance Amplify
Instructions
I coloured and die cut the emu, antlers and branch. I heated the Radiance Amplify on the antlers for some fun, fluffy dimension and glued them together. I die cut two large leaves from some cardstock I had in my stash and coloured with Falling Leaves Nuvo Shimmer Powder. I die cut four large circle frames from the Cross Stitched Nested Circles and one from craft foam. Set these all aside.
I used a smaller circle die from the same set to die cut the card base – I sent it through my die cutting machine where it cut the first layer and embossed the back of the card base. Using those embossed imprints, I was able to send the die through my die cutting machine again to get the circle cut in exactly the same place as the front to get a fully see through card.

To be able to include the shaker, I also needed one more white panel for the very back of the card. I used a left over circle die cut to temporarily glue it into place on this third piece, and used that as a guide to send the circle die through the die cutting machine again to get the third circle cut. In my picture examples below, I am showing the third piece in kraft colour so you can see it a little better.


The shaker was made by cutting up the packaging that my stamp set came in – I created a pocket with thin double sided adhesive and filled it with confetti and taped it shut. This was glued in between the back of the card base and the third panel with the circle die cut.
You can see here the shaker in the back of the card. While there is dimension, there is almost no added thickness and the confetti moves freely between the two layers. Also, there’s plenty of room to write your cheery Christmas message on the inside of the card.

I created the frame on the front of the card by starting with the foam circle, placing the branch, then one circle frame with the leaves cut to fit, two more circle frames, the emu’s neck, and the final frame on top. The antler is secured to the top frame.
I coloured the little chipboard gifts by pressing them directly onto a Festive Berries Distress Oxide ink pad and heat embossed the ribbon details using a Ranger Embossing pen and gold embossing powder. I used a white Sakura gel pen for the dots and stripes to decorate and sat them inside the frame. I also heat embossed the curly chipboard element with gold and gold sparkle embossing powders to sit beneath the frame.
Here, you can see a close up of all the different layers I was able to get with this card.

I cut the word Merry three times from white cardstock and once from red glitter paper and stacked them together. I white heat embossed Christmas from the stamp set and placed on the front. (I did cut the Merry Christmas sentiment stamp in half to do this, but they will place easily back together on an acrylic block or stamp platform for future use).
As a final touch, I added Nuvo shimmer pen to the emu and the baubles, plus a little Nuvo Crystal glaze on the baubles for shine.
You can skip the shaker part entirely and still have a see through card, or you could keep the back of the card whole and still have dimension with the layers on the front. However, this card was really fun to make in its entirety, and I hope you enjoy creating a see through card too

Aileen Ryan
November 19, 2019
Hi, I just love this new set. The card looks amazing and I cant wait to get started on my new stamps. Just a question if you dont mind. I am trying to work out what ‘I emu you’ means. I dont know if I am over pronouncing the words. Much appreciated.