30 day change of mind returns available
30 day change of mind returns available
Add description, images, menus and links to your mega menu
A column with no settings can be used as a spacer
Link to your collections, sales and even external links
Add up to five columns
Add description, images, menus and links to your mega menu
A column with no settings can be used as a spacer
Link to your collections, sales and even external links
Add up to five columns
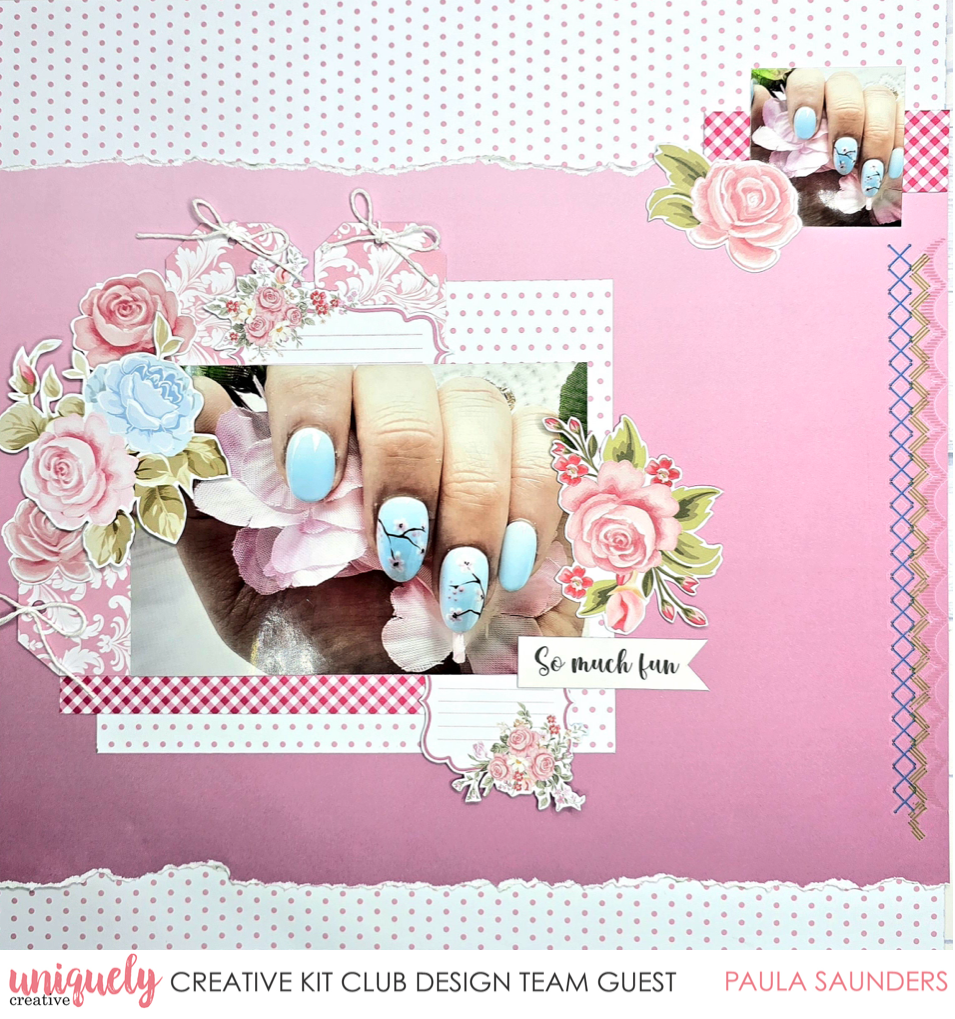
SO MUCH FUN LAYOUT TUTORIAL - PAULA SAUNDERS
May 10, 2025 1 Comment

To recreate this amazing layout created by Design Team member Paula Saunders you can follow the steps below:
Uniquely Creative Products Used:
· UCP2900 Quilt Block Paper
· UCP2899 On the Bias Paper
· UCP2898 Sew Pretty Paper
· UCP2902 Jelly Roll Paper
· UCP2903 Layer Cake Paper
· UCP2901 Beautiful Binding Paper
· UCE2094 Patchwork Roses Rub-ons
· UCE2093 Fabric Scalloped Borders
Other Products Used:
· Twine - White
· Hole Punch
· Trimmer, scissors, ruler
· Double-sided tape, foam tape, glue
Photo Size: 4x6" portrait & 2"x2"
Step 1:
Find the UCP2900 Quilt Block (pink dot paper) & trim a piece to measure 3 x 12”. Trim another piece of this paper to measure 1 ½ x 12”
Step 2:
Find the UCP2899 On the Bias (ombre pink paper) & trim to measure 10 x 12”, rip along the two long sides & adhere the two strips of pink dot paper (you cut out above) to the top & bottom of the ombre pink so that your layout measures 12x12” again
Step 3:
Roughly cut out three strips of sewing from the UCE2094 Rub-Ons & place down the right side of the layout
Step 4:
Trim some UCP2900 Quilt Block (pink dot paper) to measure 6 ½ x 6”. Adhere to your layout with the dot side showing & the 6 ½” side along the top, coming in 1 ¼” from the left & up 2 ½” from the bottom
Step 5:
Find the UCP2898 Sew Pretty (red gingham paper) & trim to measure 3 x 6” & adhere to the layout coming in ¾” on the left & up 3” from the bottom
Step 6:
Find the UCP2901 Beautiful Binding (pink & white damask paper) & trim three pieces to measure 1 ¾ x 3”. Cut a tag shape in one short side of all three pieces, punch a hole in the tops & tie a bow through the holes with twine. Adhere to your layout
Step 7:
Find the UCP2903 Layer Cake (fussy cut sheet) & cut out two of the journaling pieces with flowers then adhere to the back of your 4 x 6” landscape photo
Step 8:
Adhere your photo to the middle of the layout
Step 9:
Cut out the images shown below from the UCP2902 Jelly Roll & adhere to the left of the photo on your layout, using foam tape to raise some of the flowers Step 10:
Trim a piece of left over red gingham paper to measure 1 x 3”, adhere to the top right of the layout.
Step 11:
Adhere a 2 x 2” photo over the top of the gingham
Step 12
Adhere the last cut out single flower to the bottom left of the 2 x 2” photo
Step 11:
Adhere the SO MUCH FUN title to the bottom right of your photo
1 Response
Leave a comment
Newsletter
Join our mailing list and never miss an update …

Kristina
May 19, 2025
I love this layout! Thank you for sharing your creativity and inspiring us to create. Thank you, too, for the instructions and photos – they are very helpful!