Disco Birds - Natalie Elphinstone
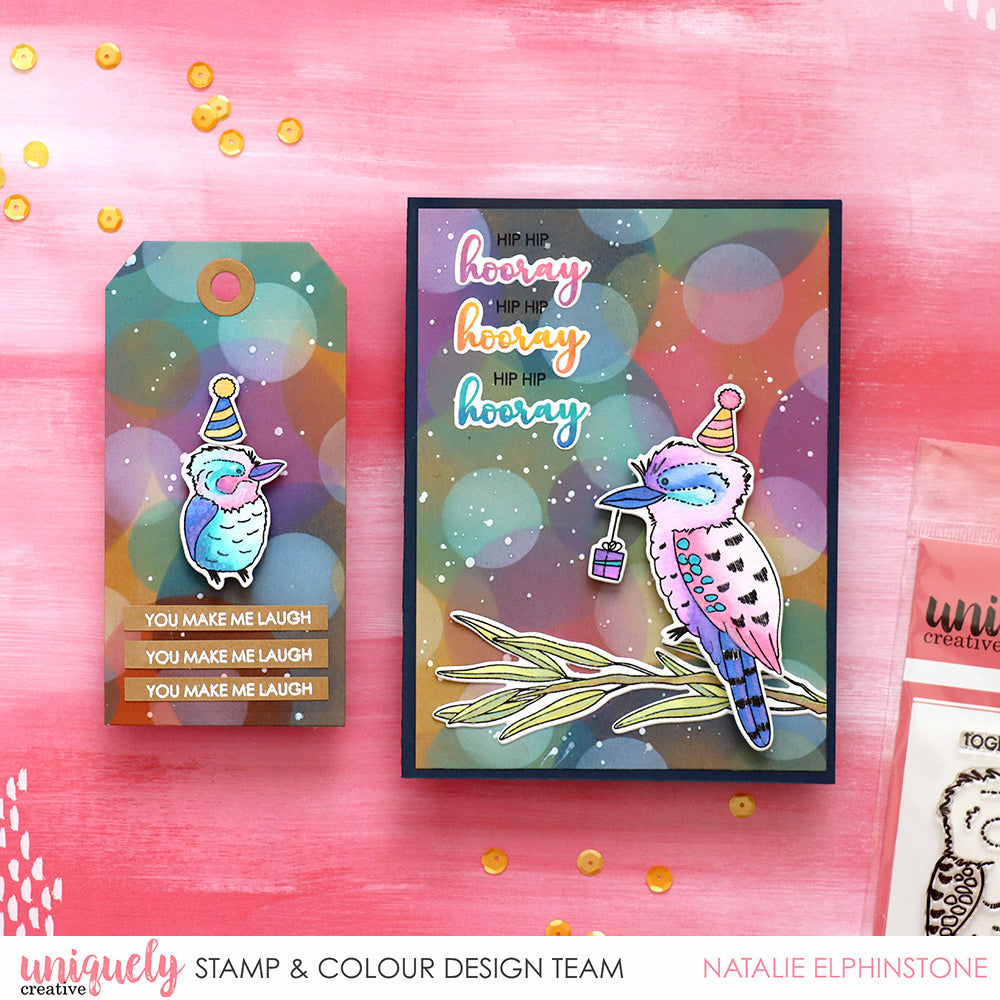

Card Size 6 x4” navy cardstock
Uniquely Creative Products Used
Kookaburra Party Stamp Set and Coordinating Dies
Other Products Used
Kraft and white cardstock, circle punches and dies, Distress Oxide ink (in various colours), Hero Arts white pigment ink, white spray ink, foam tape
Instructions:
Step 1: Cut a piece of kraft cardstock just slightly smaller than your navy card base. This is what we are going to create our ‘disco lights’ background pattern onto. Use a variety of different size circle dies or punches on scrap cardstock to create a series of stencils for yourself. I used 3 different sizes.

Step 2: Start with the biggest circle ‘stencil’ and sponge on a few circles in different coloured inks. The Distress Oxide inks are opaque even on dark cardstock, and they overlap nicely without creating muddy colours, so are perfect for this technique.

Step 3: Move onto the middle-sized circle ‘stencil’ and repeat the process – covering up most of the background area. You can always go back in with the large circle again at this point too. Play around with it until you’re happy.

Step 4: Use the smallest circle ‘stencil’ firstly with Distress Oxide inks like before, and then a second layer with a white pigment ink (I’m using Hero Arts) to finish it off. I also added a splatter of white ink to create tiny little droplets right at the end. It should look a crazy cool bokeh effect, or like those screen-savers on your i-Phone!

Step 5: Stamp out the images you want to use from the “Kookaburra Party” stamp set onto watercolour paper with a permanent ink like Staz On. I used the same Distress Oxide inks to colour the images so that my finished card would look quite consistent. I did that by stamping off some of the ink onto an acrylic block and then using an aqua pen (or a paintbrush dipped in water would be fine) to pick up the ink and paint with it.

Step 6: Use the same colours of Distress Oxide inks to stamp the sentiment. I stamped out “hooray” three times, each time creating an ombre effect with 2 colours. Then I cut these out with the coordinating dies.

Step 7: Assemble the card by first adhering the background disco piece onto the navy card. Then attach the images (mounting some with foam tape for extra dimension), and stamping “hip hip” in between each “hooray” sentiment. It’s three cheers for the disco kookaburra!! LOL!

5 Responses


itusmavomafuu
August 22, 2020
http://mewkid.net/when-is-xuxlya/ – Amoxicillin 500 Mg Dosage Amoxicillin 500mg ory.niyl.uniquelycreative.com.au.qyk.sx http://mewkid.net/when-is-xuxlya/