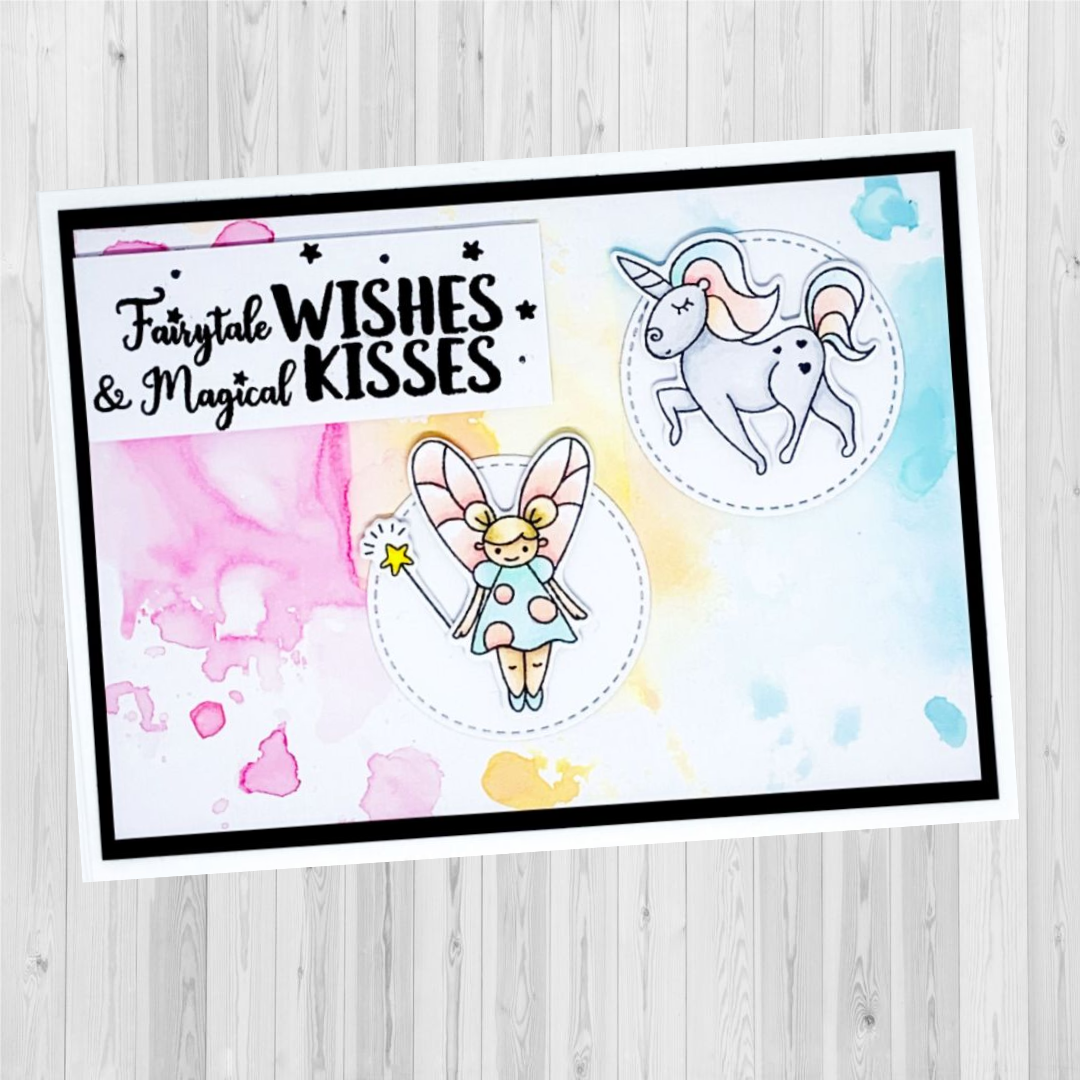
‘Fairytale Wishes & Magical Kisses’ – Ashleigh Freeston

Uniquely Creative kit used:
Fairytale Wishes Stamp & Colour kit
Uniquely Creative Products used:
‘Fairytale Princesses’ stamp set and die, Stitched Nesting Circles Die
Other Products used:
Worn Lipstick Distress Oxide, Dried Marigold Distress Oxide, Tumbled Glass Distress Oxide, Onyx Black Versafine ink, clear embossing powder, black cardstock, smooth white cardstock (I used Kaisercraft cardstock), acetate/plastic packaging, water spray bottle, Copic Markers
Copic Colours:
Fairy – E000, E00, E21, E11, E04 (skin); E50, E51, E53, E55 (hair); BG0000, BG000, BG10, BG11 (dress); R00, R01, R30, R32 (wings/spots on dress)
Fairy Wand – Y13, Y15, Y17
Unicorn – C00, C0, C1, C3 (body); BG0000, BG000, BG10, BG11. R00, R01, R30, R32, YR0000, YR000, YR00 (mane/tail)
Instructions:
- Cut base card down to 5 ¾” high.
- Cut black cardstock to 4” x 5 ½”. Cut white cardstock to 3 ¾” x 5 ¼”.
- Smoosh Worn Lipstick Distress Oxide onto small piece of acetate/plastic packaging. Spritz lightly with water. Carefully turn over and press onto left side of white cardstock. Dry thoroughly with heat tool. Repeat if more depth of colour is needed.
- Repeat step 3 with Dried Marigold, and then Tumbled Glass, drying in between each colour.
- Die cut 2 circles from white cardstock and adhere per image. Stamp sentiment with black Versafine ink and heat emboss with clear embossing powder.
- Assemble card as per image, using foam mount for sentiment and coloured images.