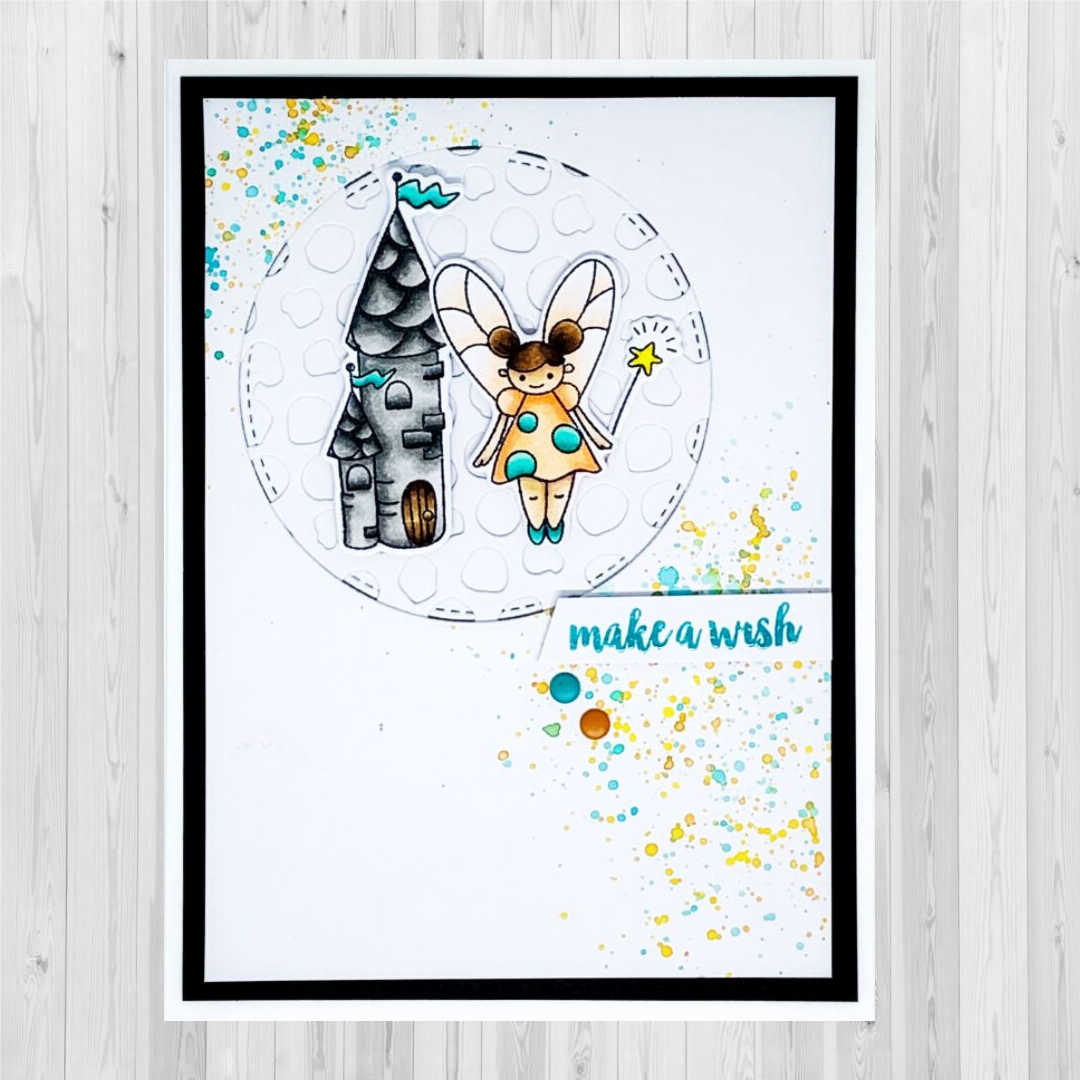
‘Make a Wish’ – Ashleigh Freeston

Uniquely Creative kit Used:
'Faitytale wishes' Stamp & Color Kit
Other Uniquely Creative Products Used:
‘Fairytale Castle’ stamp set and die, ‘Fairytale Princesses’ stamp set and die, Stitched Nesting Circles die, Wonky Punchinella die
Other Products Used:
Spiced Marmalade Distress Oxide, Peacock Feathers Distress Oxide, clear embossing powder, black cardstock, smooth white cardstock (I used Kaisercraft cardstock), thin paintbrush, water spray bottle, Copic Markers
Copic Colours:
Castle – T0, T2, T4 (main bricks); T0, T2, T4, T5, T7 (turrets), BG11, BG13, BG15, BG18 (flags); E21, E23, E25, E27, E29 (door)
Fairy – E000, E00, E21, E11, E04 (skin); E23, E25, E27, E29 (hair); BG11, BG13, BG15, BG18 (teal spots/shoes); YR000, YR00, YR02 (dress); YR0000, YR000, YR00 (wings); Y13, Y15, Y17 (wand)
Instructions:
- Cut base card down to 5 ¾” high.
- Cut black cardstock to 4” x 5 ½”. Cut white cardstock to 3 ¾” x 5 ¼”
- On white cardstock, die cut circle from top left side.
- Smoosh Spiced Marmalade Distress Oxide onto craft sheet and spritz with water. Using thin paintbrush, splatter ink on top left corner and bottom right corner of white cardstock. Repeat with Peacock Feathers Distress Oxide. Dry completely.
- From a separate piece of white cardstock, die cut Wonky Punchinella. Attach to back of background piece. Inset Stitched Circle behind the punchinella.
- Assemble card as per image. Stamp sentiment with Peacock Feathers Distress Oxide and heat emboss with clear embossing powder. Foam mount the sentiment and coloured images.