Nesting Sun Platypus Cards - Natalie Elphinstone

Card Size 6" x 4"
Uniquely Creative Products Used
My Platypus Stamps and Dies, Nesting Sun Die, Stitched Nesting Circles Die Set, UNIQOLOUR Markers, Watercolour Paper, Enamel Dots
Colours Used
UNIQOLOUR Markers
Instructions
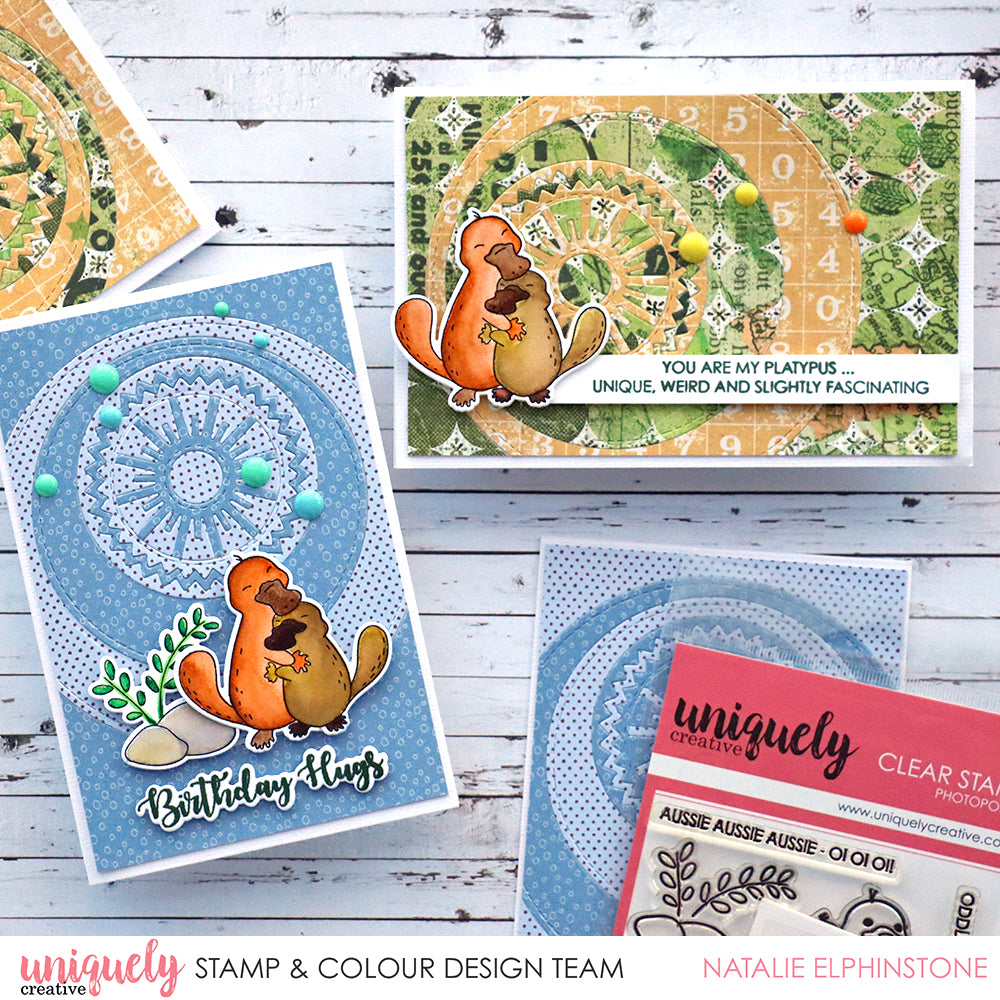
1. Take the ‘Nesting Sun’ die, and two larger circle dies from the ‘Stitched Nesting Circle Die Set’ and adhere them together with tape. I arranged them with the circles closer together on one side so that the finished pattern would look more like radiating sunbeams. But alternatively you could space the dies out more evenly so the pattern becomes one of concentric circles.

2. Cut two pieces of patterned paper the same size as your card base (mine is 6x4”) choosing colours that will coordinate together well. I’m using patterned paper from the July Mini Kit. Place your dies on top of them where you would like (it doesn’t matter if the paper is smaller than the dies) and cut them out. If you’re cutting out your two pieces of paper separately (which is the standard) then make sure you measure precisely where you’re placing the dies so that the two pieces end up being cut exactly the same.

3. Next, cut two pieces of backing cardstock slightly smaller than your 6x4” card base. These are what we’re going to build our background onto, and then it will adhere to the card base at the end. Cover them both with double sided tape. I have this amazing roll which is actually 4” wide, making this part a breeze! But if you don’t have that, lots of strips of your standard width tape will be fine. Or you can simply glue each piece as you go.

4. Peel off the backing tape so your two panels are now sticky and start building up your background from the outside in. By using two colours of patterned paper and alternating the colours as you go, you’re going to end up with two background panels at the end. You could also consider cutting more pieces of patterned paper so your design is even more colourful, and you would end up with as many background panels as the number of colours you chose. For example, if you die cut and used 3 patterned papers, you would have enough pieces to make 3 background panels, and so on. Not a bad way to batch-make some cards all at once.

5. Stamp your chosen images from the ‘My Platypus’ stamp set onto watercolour paper using a permanent ink such as StazOn, and then colour them with Uniqolour Markers. When they’re dry, cut them out with the matching dies.

6. To assemble the finished card, simply adhere the background panel to your card base, then use foam dots to secure your images. Stamp and cut out a sentiment to add below them, and finish off with some enamel dots.

2 Responses

VbFtgcYHjSwEOJ
July 27, 2020
gtzmxikZQAjbRaCF